5. Cleanto booking form right side default description
6. How to use PayPal Payment Gateway in Cleanto?
7. Manageable font style for forntend (booking form) labels
8. Cron Job
9. How to use 2Checkout Payment Gateway in Cleanto?
10. Language Switcher For Frontend
11. Installation & Basic Configuration Guide
12. How to manage staff?
13. Cleanto – Main Features
14. How to use Google Calendar in Cleanto?
15. Update with New Version
16. How to use Google Calendar in Cleanto
17. How to use Invite & Earn
18. How to use TextLocal in Cleanto?
19. How to use PayUMoney Payment Gateway in Cleanto?
20. How to use Authorize.Net in Cleanto?
21. Cleanto Change Log
22. Shortcode or embed code in wordpress
23. Services - Add method, units
24. Language Translation
25. Email auto reminder
26. Features - Users
27. How to use QuickBooks?
28. Features - Admin
29. Cleanto booking form right side default description
30. How to use Stripe Payment Gateway in Cleanto?
31. How to use Plivo SMS Gateway in Cleanto?
32. How to use Twilio SMS Gateway in Cleanto?
33. How to add Extensions in Cleanto?
34. How to use SMTP for email in Cleanto?
1. Update with New Version
How to update existing version of Cleanto?
First of all just take backup of old Cleanto files which is on your root path (http://yourwebsite/cleanto/).
Just follow the steps to update Cleanto into latest version:
Step 1: Take backup of your website files and database.
Step 2: Now note down the database credential from old Cleanto's config.php hostname, username, password, database name and Envato purchase code.
Step 3: Now download latest Cleanto package from Envato and unzip cleanto.zip file you got with downloaded pack and replace all Cleanto current version files with latest version files.
NOTE: Don't make any change in database.
Step 4: After replacing the files, Cleanto root URL will show easy installer as follows:
Choose update option on step first of installer and follow all other steps. Put the all required information (hostname, username, password, database name and Envato purchase code), it will create config.php automatically.
All is done and now check with login at http://yourwebsite/cleanto/admin
After got api key you need to add that in admin settings->sms notification->messagebird
You need to set api key in admin.
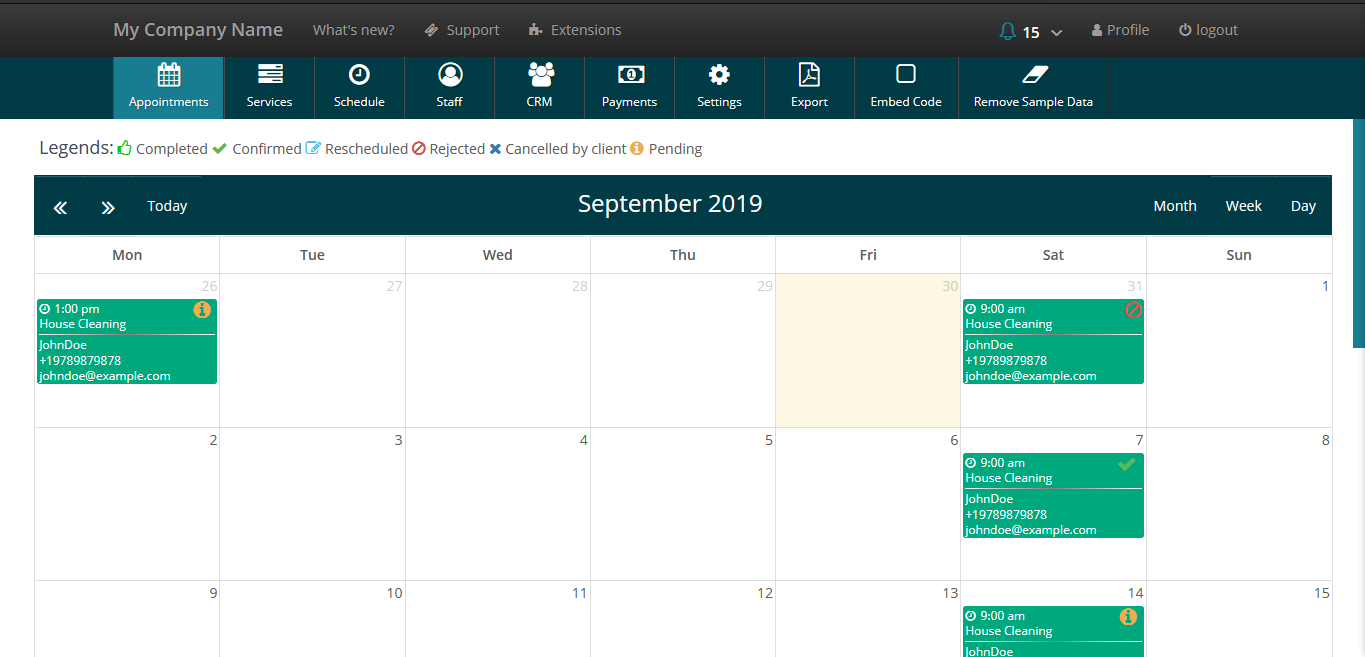
3. Appointments Calender
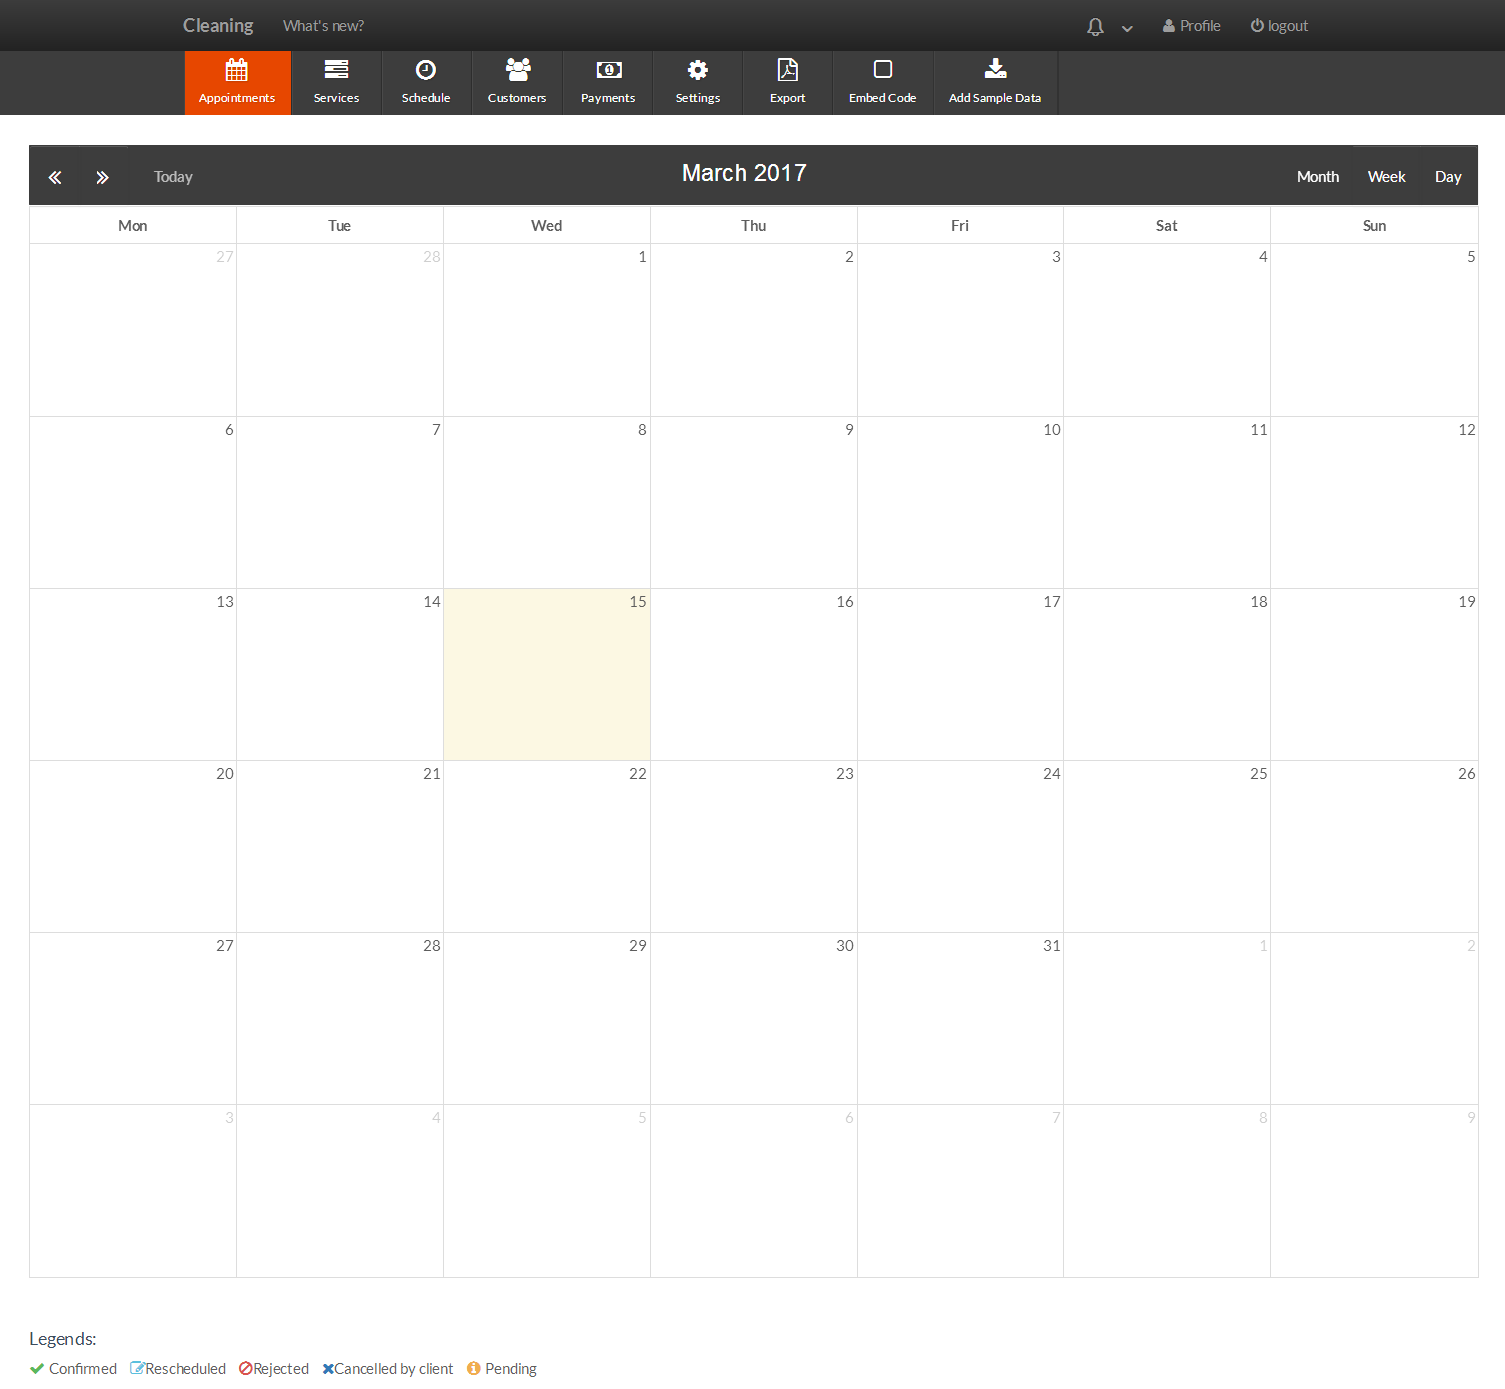
Appointments Quick view is helpful to check all quick pending actions that you need take as an administrator or service provider. This show Past Appointments and Upcoming Appointments, The Admin can either Confirm , Reject, Delete , Reschedule and cancel the appointment on Appointment Calendar.
Also Cleanto have provide different-different view for seeing whole appointments. Also get notification for each new booking/appointment.
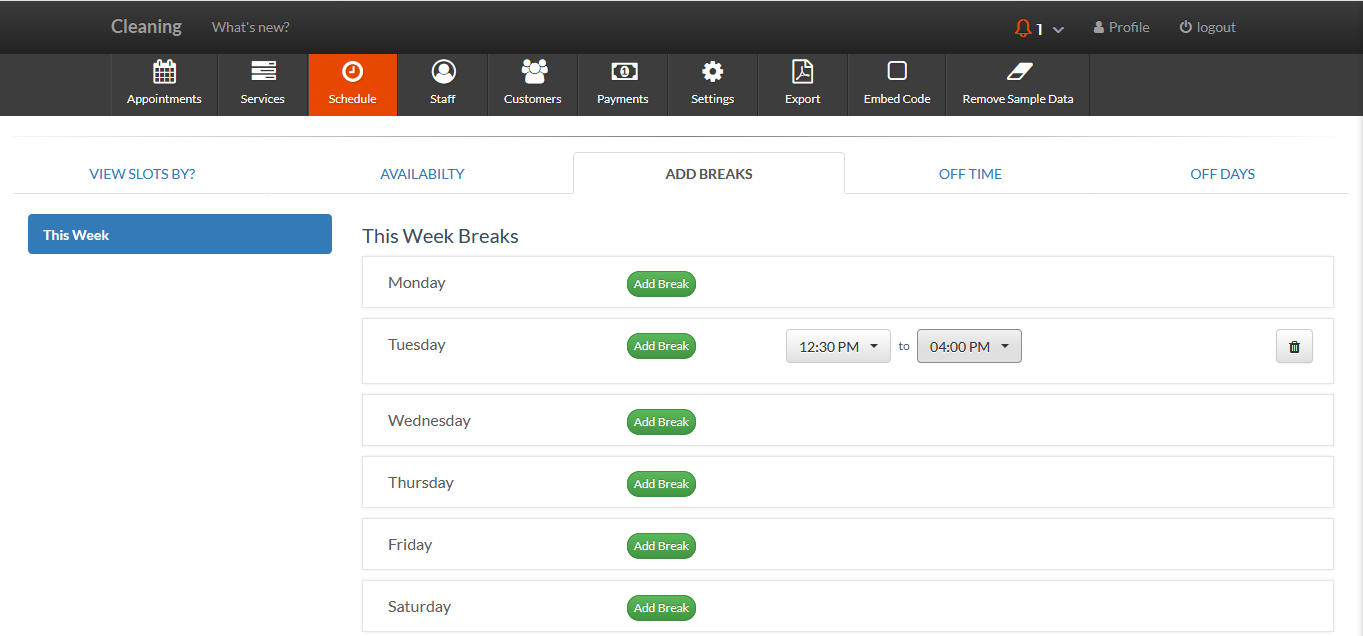
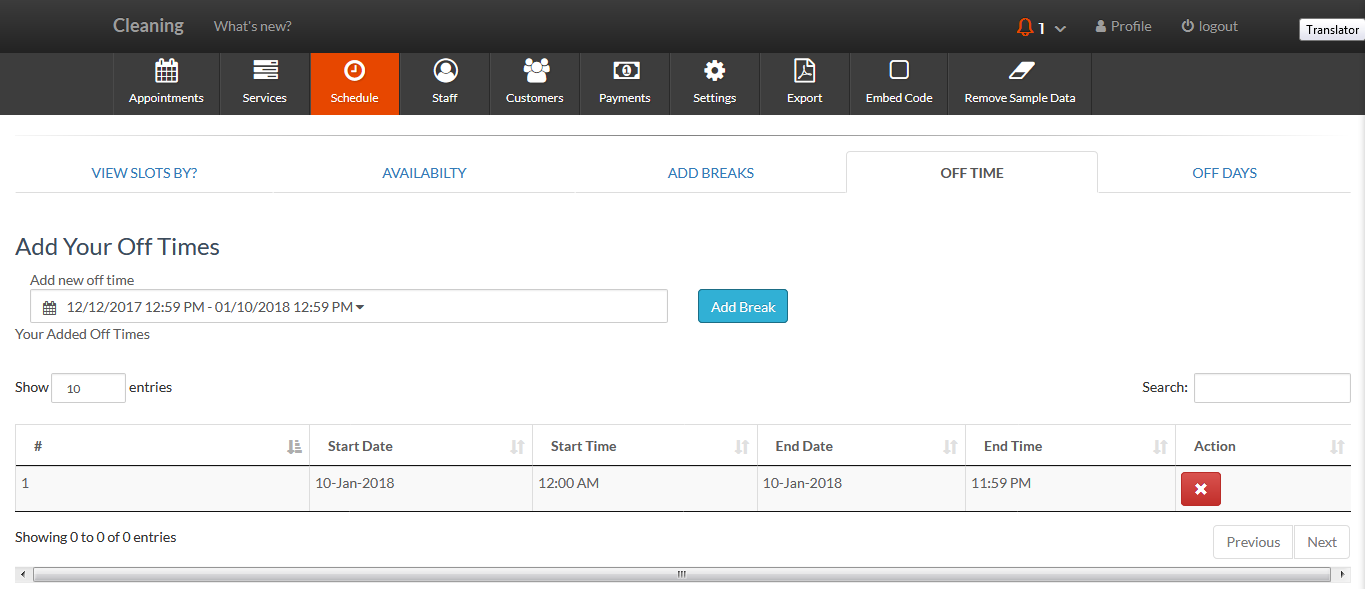
4. Scheduling in cleanto
What is the use of this scheduling?
The best feature of this product is scheduling.
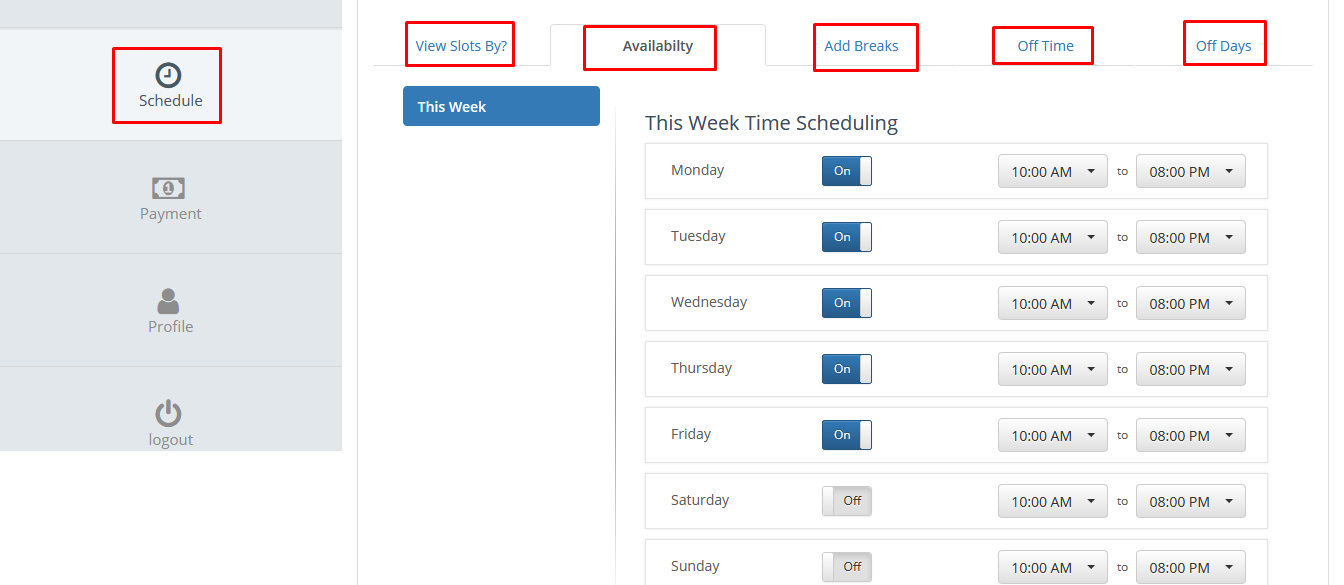
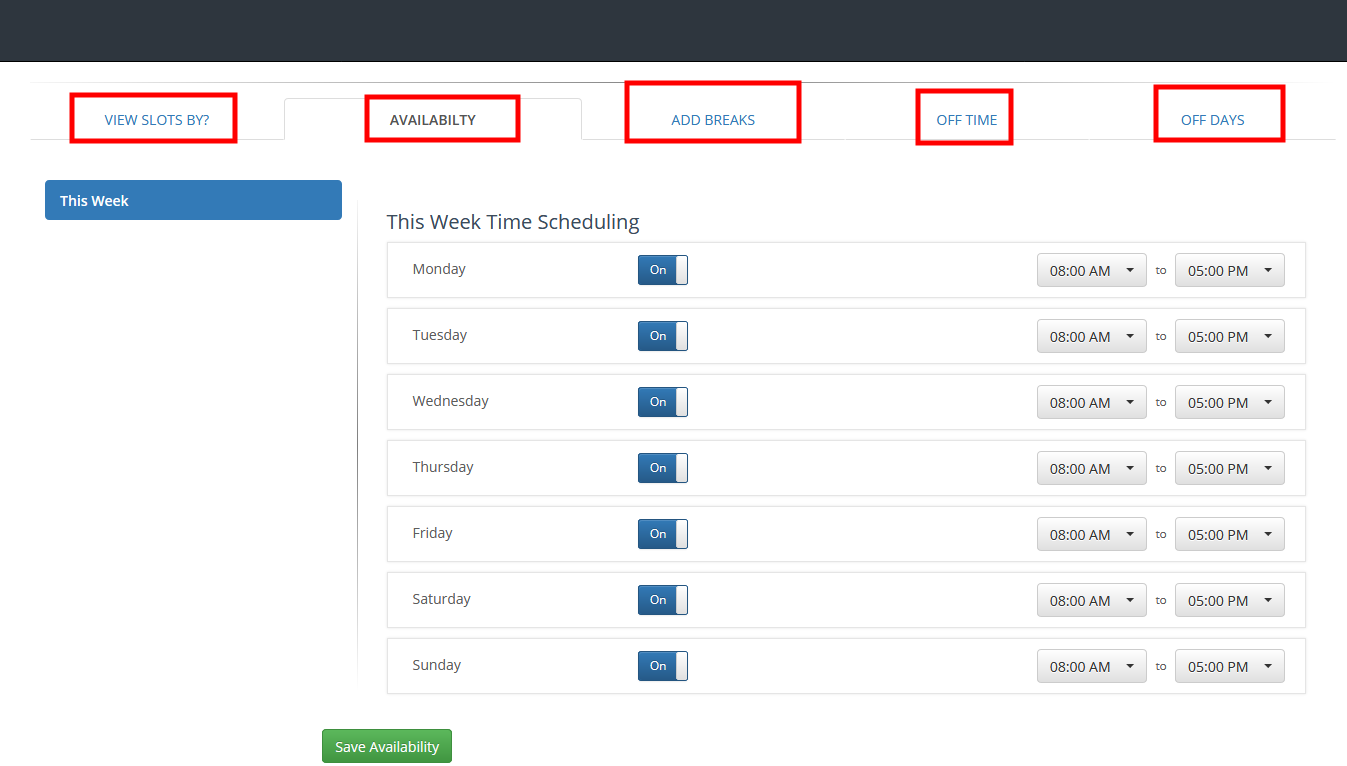
You can schedule your time slots for service easily form this panel. Your can manage your availability , breaks , off times and off days.
You can get easy with this through below images.
Screen First "VIEW SLOTS BY?"
Screen Second "AVAILABILITY"
Screen Third "ADD BREAKS"
Screen Fourth "OFF TIME"
Screen Fifth "OFF DAYS"
5. Cleanto booking form right side default description
</p>
<div class="features">
	<img class="feature-img" src="<?php echo BASE_URL ?>/assets/images/icon17.png" alt="">
	<h4 class="feature-tittle">Saves You Time</h4>
	<p class="feature-text">Lorem Ipsum is simply dummy text of the printing and typesetting industry.</p>
</div>
<div class="features">
	<img class="feature-img" src="<?php echo BASE_URL ?>/assets/images/icon21.png" alt="">
	<h4 class="feature-tittle">Safety First</h4>
	<p class="feature-text">contrary to popular belief, Lorem Ipsum is not simply random text. It has roots in a piece of classical Latin literature from 45 BC.</p>
</div>
<div class="features">
	<img class="feature-img" src="<?php echo BASE_URL ?>/assets/images/icon31.png" alt="">
	<h4 class="feature-tittle">Only The Best Quality</h4>
	<p class="feature-text">It is a long established fact that a reader will be distracted by the readable content of a page when looking at its layout.</p>
</div>
<div class="features">
	<img class="feature-img" src="<?php echo BASE_URL ?>/assets/images/icon41.png" alt="">
	<h4 class="feature-tittle">Easy To Get Help</h4>
	<p class="feature-text">There are many variations of passages of Lorem Ipsum available, but the majority have suffered alteration in some form, by injected humour.</p>
</div>
<div class="features">
	<img class="feature-img" src="<?php echo BASE_URL ?>/assets/images/icon51.png" alt="">
	<h4 class="feature-tittle">Seamless Communication</h4>
	<p class="feature-text">All the Lorem Ipsum generators on the Internet tend to repeat predefined chunks as necessary, making this the first true generator on the Internet.</p>
</div>
<div class="features">
	<img class="feature-img" src="<?php echo BASE_URL ?>/assets/images/icon61.png" alt="">
	<h4 class="feature-tittle">Cash-Free Payment</h4>
	<p class="feature-text"> It was popularised in the 1960s with the release of Letraset sheets containing Lorem Ipsum passages.</p>
</div>
<p>
You can modify this default html according to your own requirement. Thanks.
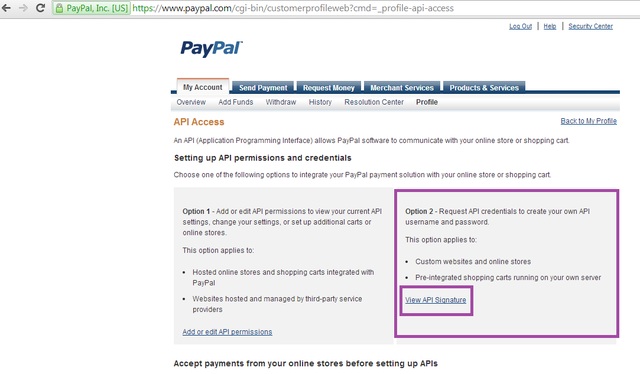
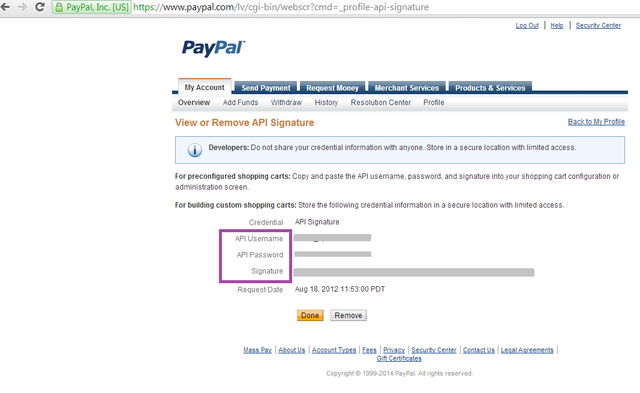
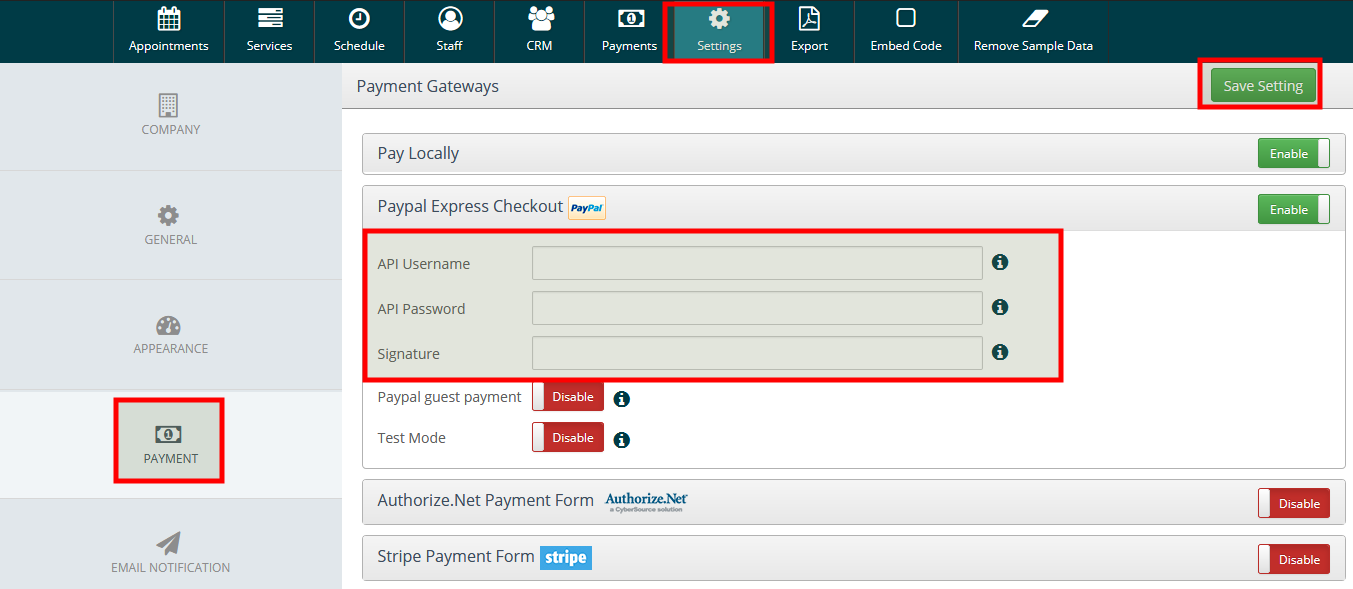
6. How to use PayPal Payment Gateway in Cleanto?
Log in to your PayPal Business account.
Click the My Account tab.
Click the Profile tab. If you haven't already done so, you need to verify your account before requesting API credentials.
Click Request API credentials under Account information.
Click Set up PayPal API credentials and permissions under Option 1.
Click Request API Credentials.
Click Request API signature.
Click Agree and Submit.
Copy your API Username, API Password and Signature. And page in your Cleanto admin area PayPal settings.
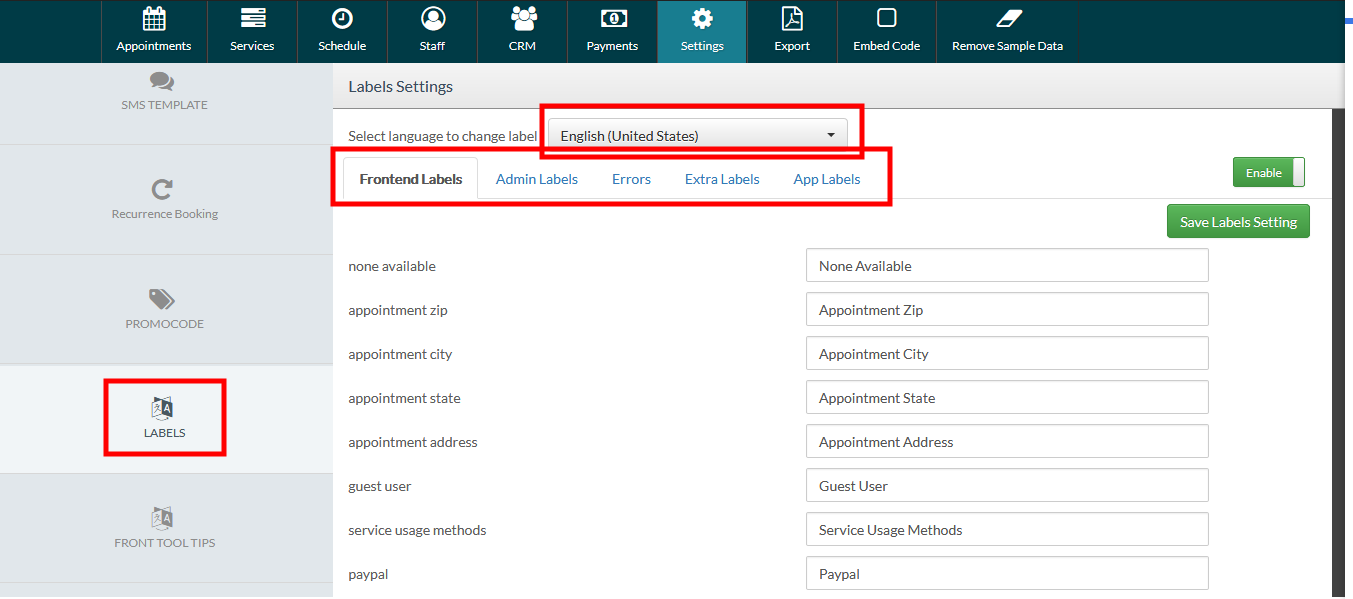
7. Manageable font style for forntend (booking form) labels
Cleanto front-end (booking form) labels font is manageable. You can use any font from the drop-down of "Google Fonts" according to your website design.
Step 1: Go to Cleanto Admin -> Setting - > Appearance -> Front-end fonts ( choose accordingly )
Step 2: Follow the path and set whole labels accordingly for Front-end Booking form. Cleanto->Admin->Settings->Labels->Choose Language->Front Labels ( Set it accordingly ). On the another hand please follow the path of this article they will help you for set your whole labels [ https://skymoonlabs.ticksy.com/article/15177/ ]
8. Cron Job
What are Cron Jobs?
A cron job is a Linux command for scheduling a task to be executed sometime in the future. This is normally used to schedule a job that is executed periodically - for example, to send out a notice every morning.
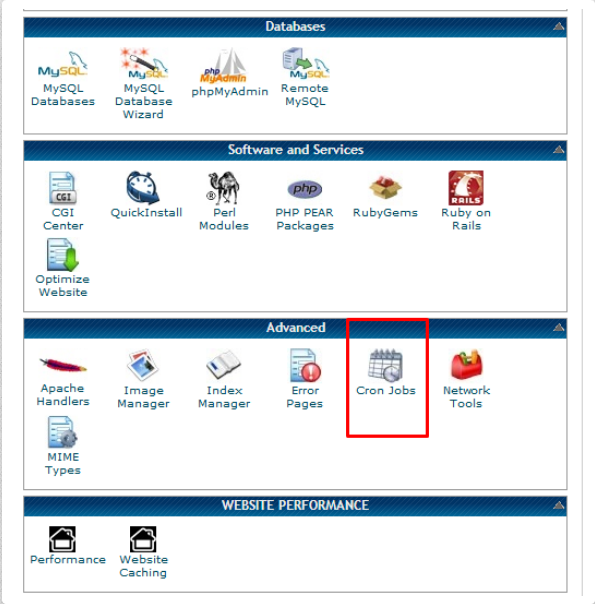
Cron Jobs run scheduled tasks at specific times. This is good to set up automated maintenance and other unmanned server duties. To create a cron job, please do the following:
Step 1: Click on the "Cron Jobs" icon inside cPanel, under Advanced.
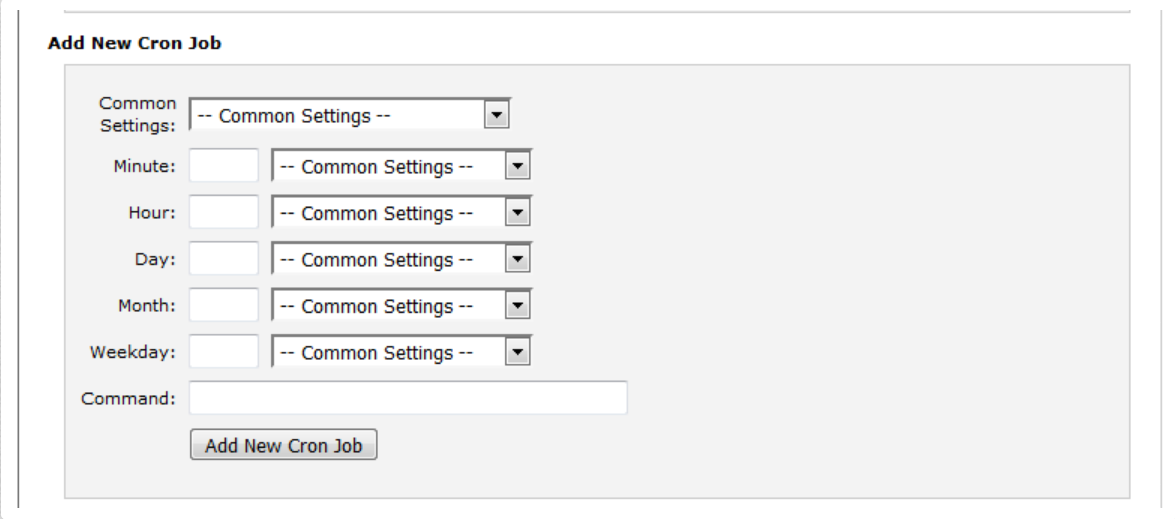
Step 2: Select the Common Setting you want. This will automatically change the other time settings.
Step 3: Alternatively, you may adjust the individual time settings. Minute, Hour, Day, Month and Weekday can be modified to achieve your goal.
Step 4: In the input box to the right of "Command", type the name of the file type, then add a space and provide the path ( Cleanto/assets/lib/email_reminder_ajax.php ) to the file which you would like the command to run.
Step 5: Click the "Add New Cron Job" button.
You have just created a cron job to execute a file at a certain time and date with the desired repetition.
Cron jobs are easy to edit and delete.
Click on the "Cron Jobs" icon inside cPanel.
Scroll down to the last section called "Current Cron Jobs".
Find the correct cron job and click either "Edit" or "Delete", under Actions.
Editing does not have the nice automated tools, so it may be easier to copy the Command, delete the cron job, and recreate it.
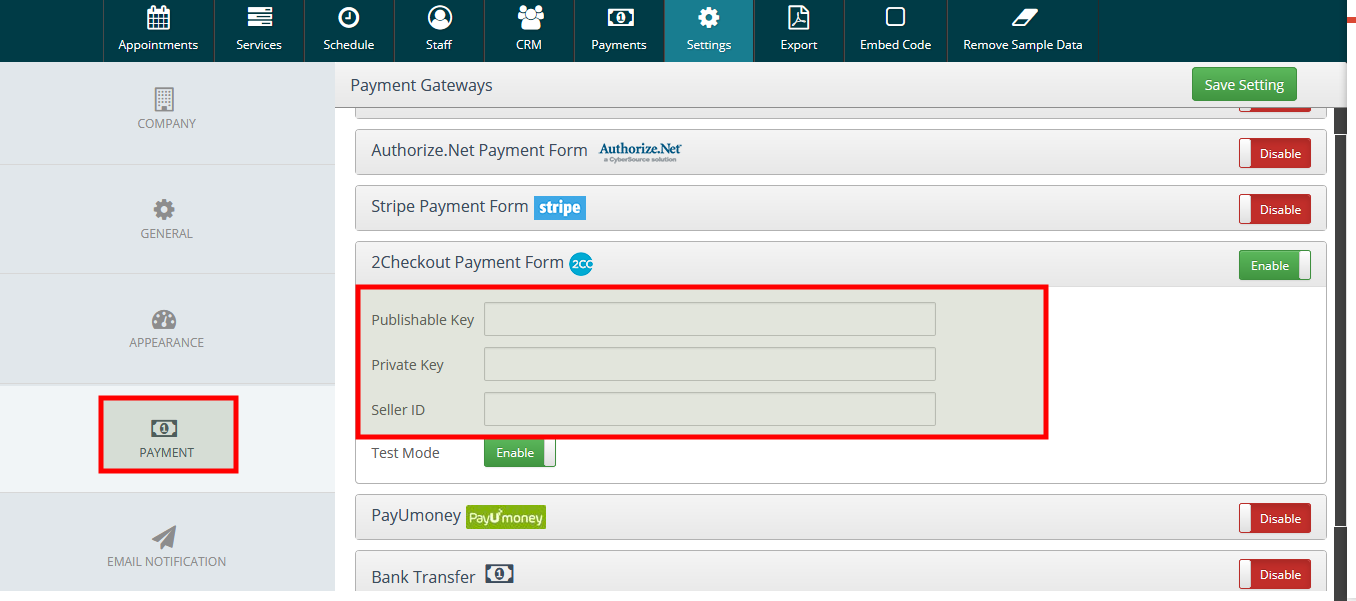
9. How to use 2Checkout Payment Gateway in Cleanto?
After login or Click On ‘Dig In & Start Testing’ button, you can see your Dashboard Like below shown.
Step 2 : Get Your API Key and Account ID
To Pay with 2Checkout payment acquirer you need to set API Private Key and Account ID. To get your account API Private Key. Go to API --> Settings. Tick on agree to terms for 2Checkout then click on the 'Start Integrating' Button then you will get your Private and Public Key. If you not able to see your Private Key and Public Key generate a new one with 'Generate' Button.For the Account ID click on the user icon on the top right as shown in the screenshot.
Set this Private Key and Account Id into your payment acquirer and get started to payment.
Step 3 : Set Up Return Url.
After the successful completion of a sale 2Checkout.com can return the buyer and sale parameters to a page on your site. Specifying an approved URL at the account level will direct all buyers to the same URL after a successful checkout. This URL can be entered on the Site Management page by clicking the Account tab followed by the Site Management sub-category.
Step 4 : Create User For API Access
Crate one API access user for get access inapi calls. there is alredy one user having Seller area access. you have to create new one for api access. For Create Username Go to Account-->User Management-->Create Username.
Update user information. Not mandatory. Then Click on Update User Button And in Account-->User Management You can see that username.
Step 5 : Order Overview
To see your all transaction with specific filter Go to Sales-->List.
Save credentials in your Admin area settings and proceed. If you facing any issue then please let us know https://skymoonlabs.ticksy.com/
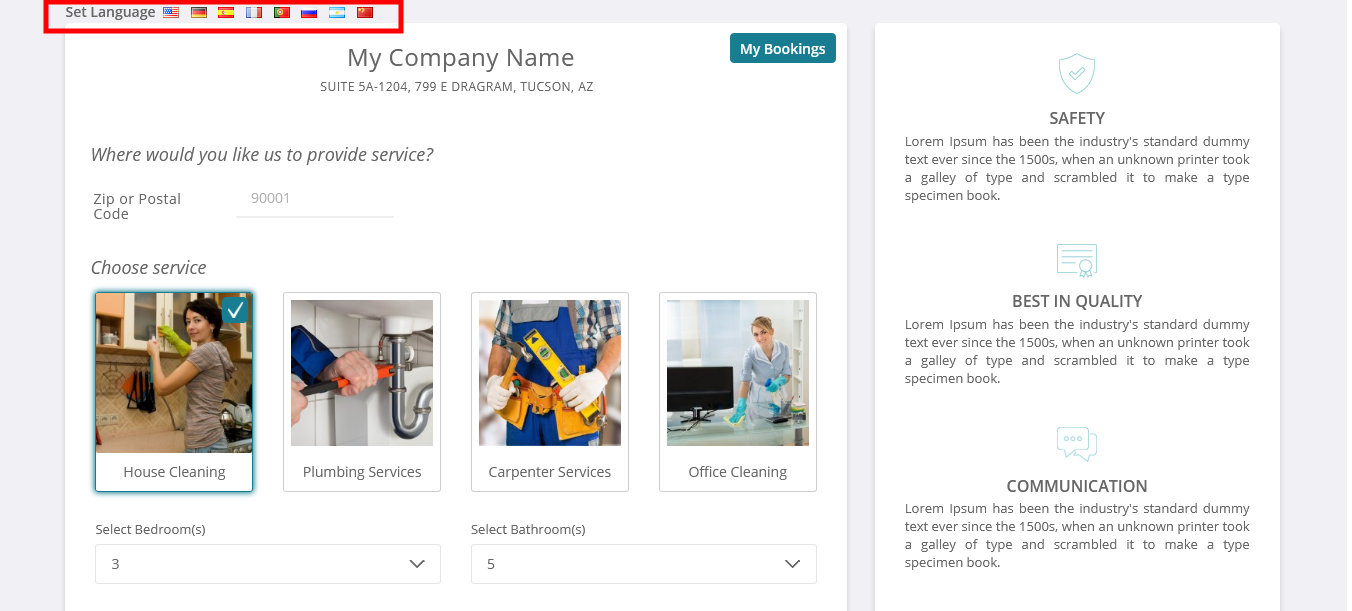
10. Language Switcher For Frontend
Cleanto is fully translatable you can translate Cleanto into any language. Also Cleanto front-end (Booking form) support multiple languages translation at same time. Appoint users can switch front-end into language accordingly. On the top of the booking page user can see number of available languages ( its depends upon admin set language list in admin label area ).
if you want to remove some flag on top of the booking page then follow the path and set it accordingly. Cleanto->Admin->Settings->Manageable Form Fields ( enable/disable accordingly ) . With using this you have hide whole language flag.
If you want to remove some particular flag. Then please follow the path and set it accordingly. With using this option hide particular flag on Booking page screen. Path : Cleanto->Admin->Settings->Labels->Choose Language ( Enable / Disable accordingly. )
11. Installation & Basic Configuration Guide
Way to Installation
We are trying to make the installation process more easy and handy so that user can install our system in his existing system with easy steps. We are also providing you the best ever installing service to integrate our application with your existing system if you have.
Step by Step guide for installation
Buy the system from us and just follow the below steps.
Step 1: Create database in your respective server.
Step 2: Take backup of your website for precaution.
Step 3: unzip Cleanto.zip file you got with downloaded pack.
Step 4: You have to put extracted folder 'Cleanto' on your website root so that the path should look like http://yourwebsite/cleanto/index.php Note: Do Not put Cleanto files on your root folder as it has index.php and it can overwrite your website files, which can be very problematic.
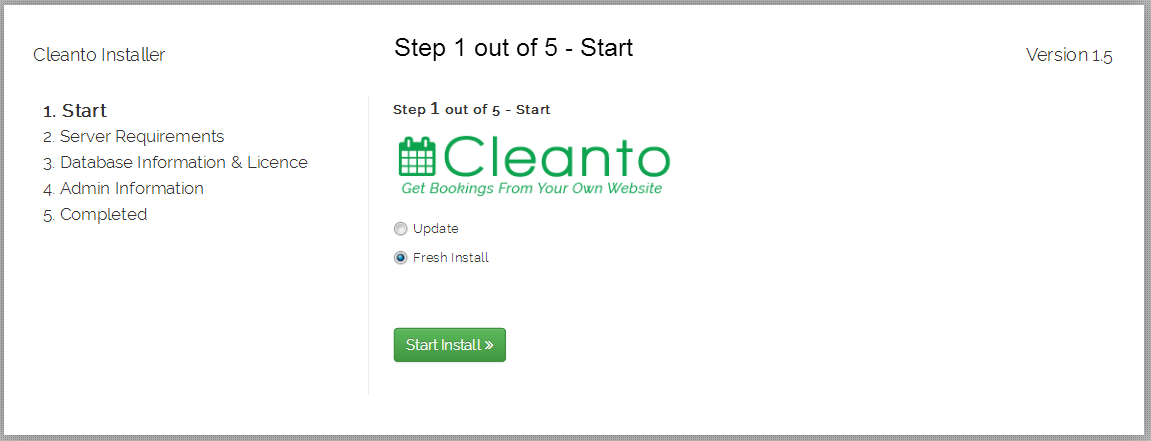
Step 6: You will now see the below Cleanto installer. 'Fresh Install' and then click on start install button.
Step 7: Check your server fulfill the requirement of Cleanto server. If all requirement fulfill properly then proceed click on next button.
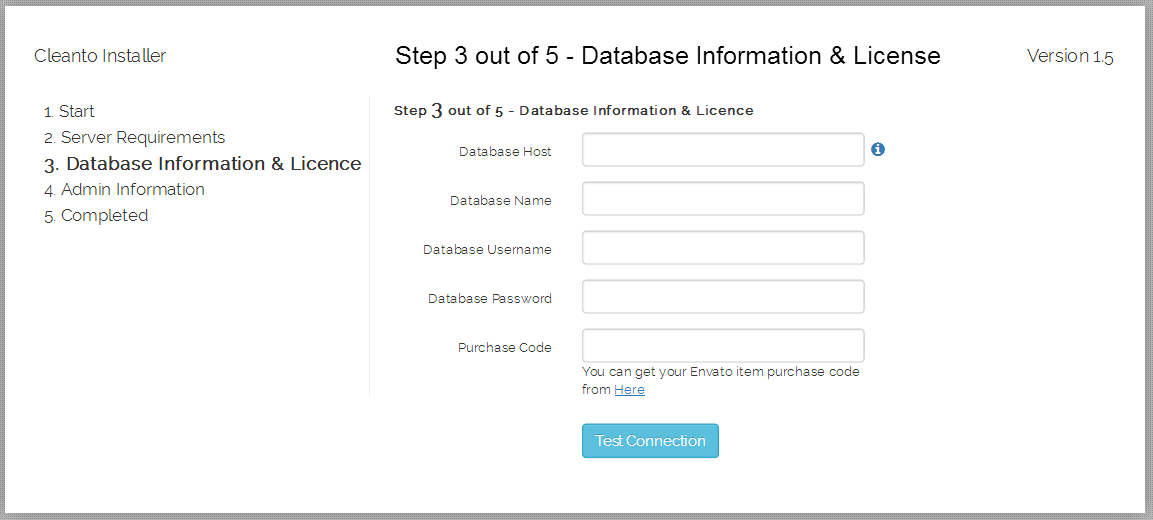
Step 8: Fill all database requirement(hostname, database name, username, password, Envato purchase code). Then click on test connection button. If your connection is successful then click on next button.
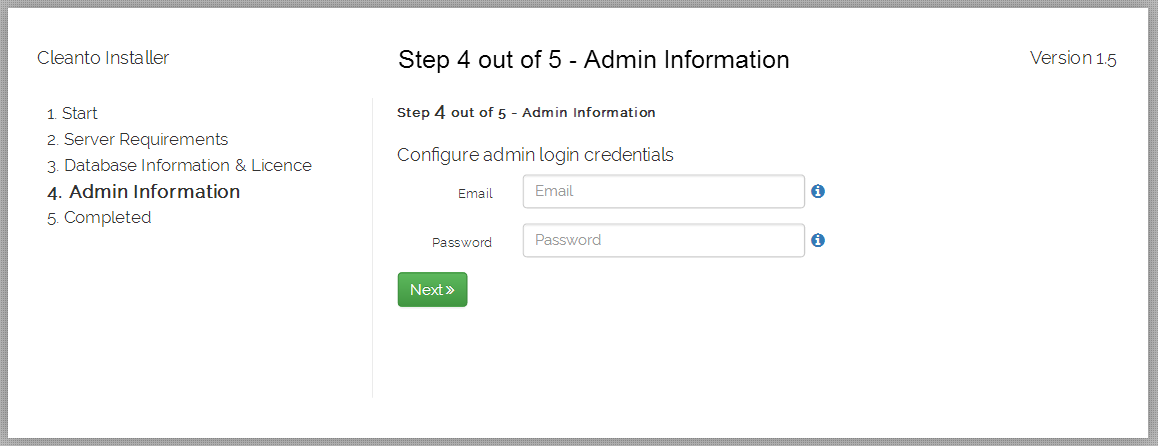
Step 9: After complete all above process you will see the main admin login where you have to enter the email and password credentials.
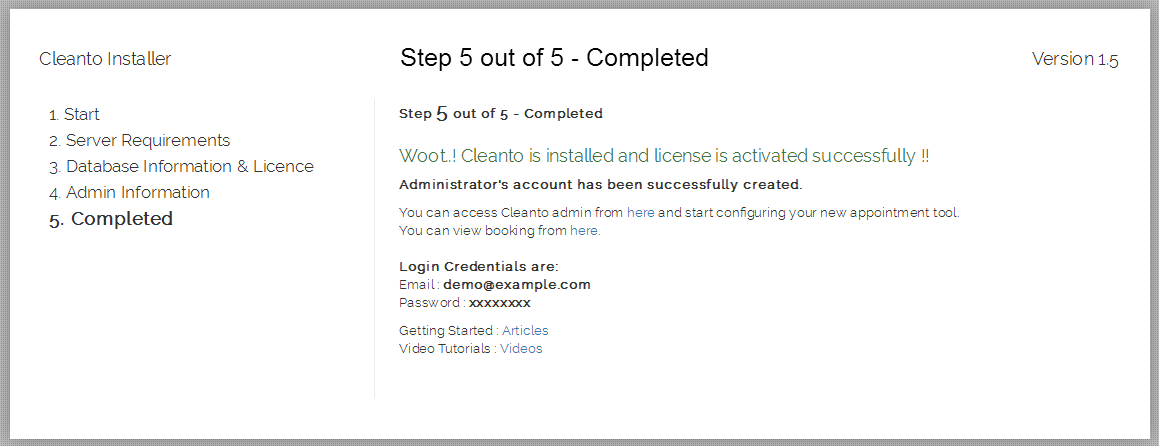
Step 11: After complete all above process you will see the main admin login where you have to enter the email and password credentials. That's all now just see the main admin panel from where you can manage the all settings. After login you can add sample data from admin panel header to view its capabilities.
Note :- If Cleanto is not being installed then follow the below step :
1. First of all you should check permissions of Cleanto files. File permission should be 644 and folder permission should be 755.
2. If the permission is correct then rise your support ticket on https://skymoonlabs.ticksy.com/ with database name, database password, database username, hostname, purchase code and web FTP or hosting access details so we will done install for you.
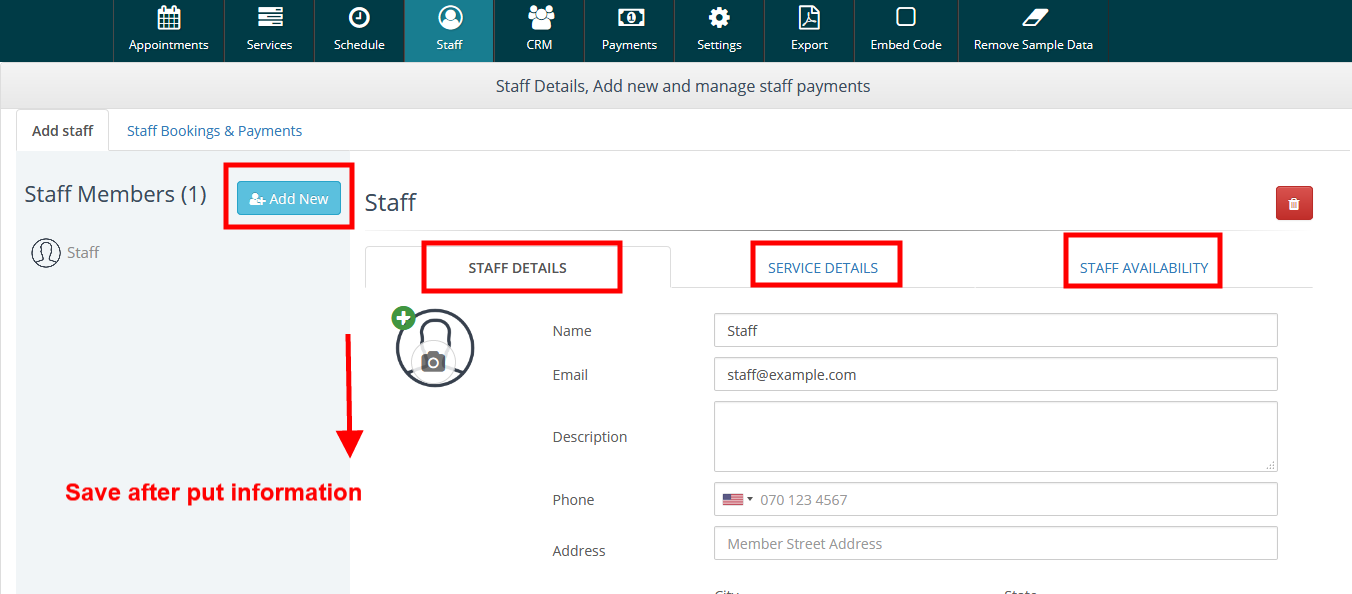
12. How to manage staff?
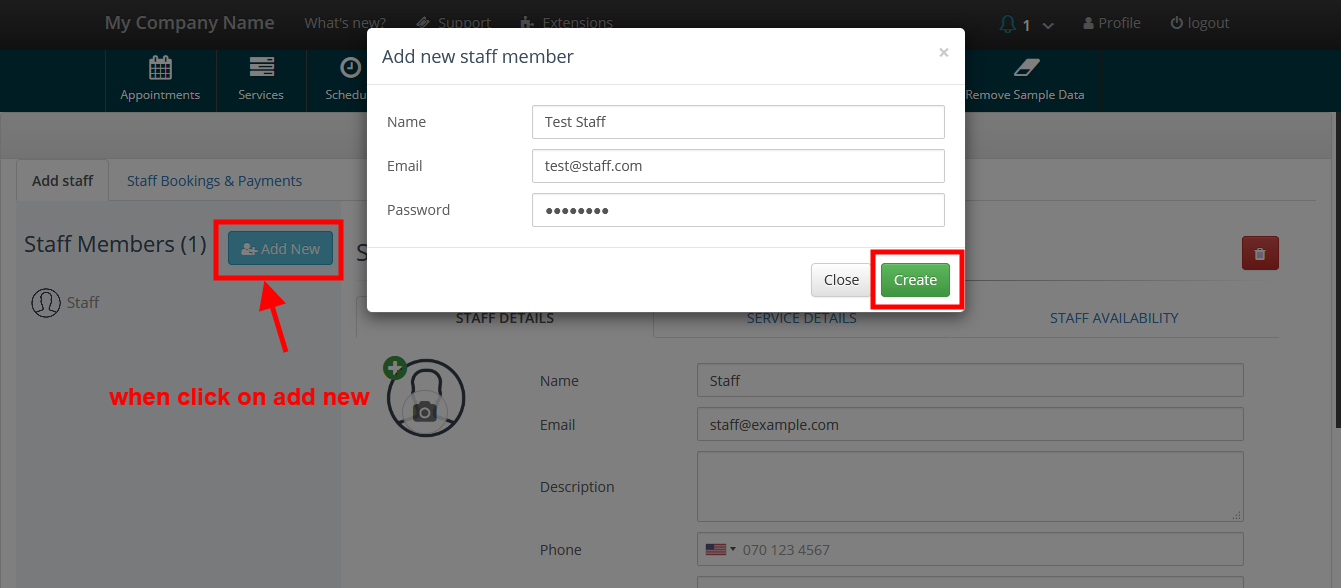
Basically staff is using for manage booking appointment. Please follow the steps and get started with staff.
Step 1 :- Click on add staff button. Put staff information and save it.
Step 2 :- You can manage all profile of staff. Also admin have created own credentials while generate staff account and share with staff member. With using these credentials staff will login on same login page (root/admin) .
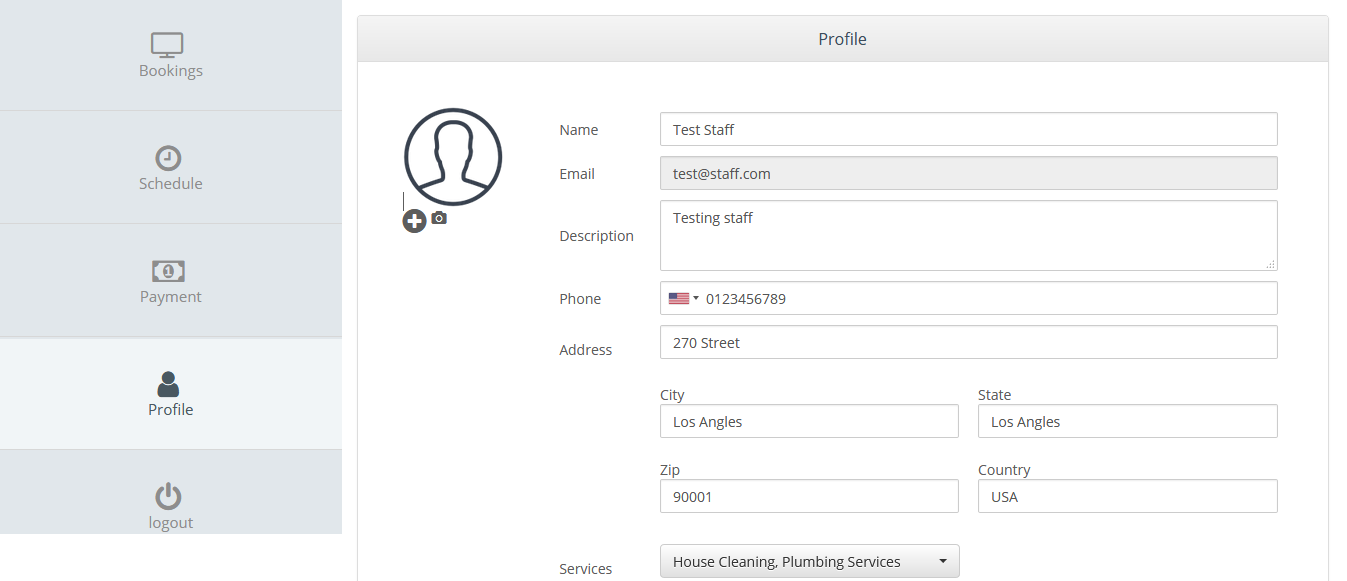
Staff Side Dashboard View
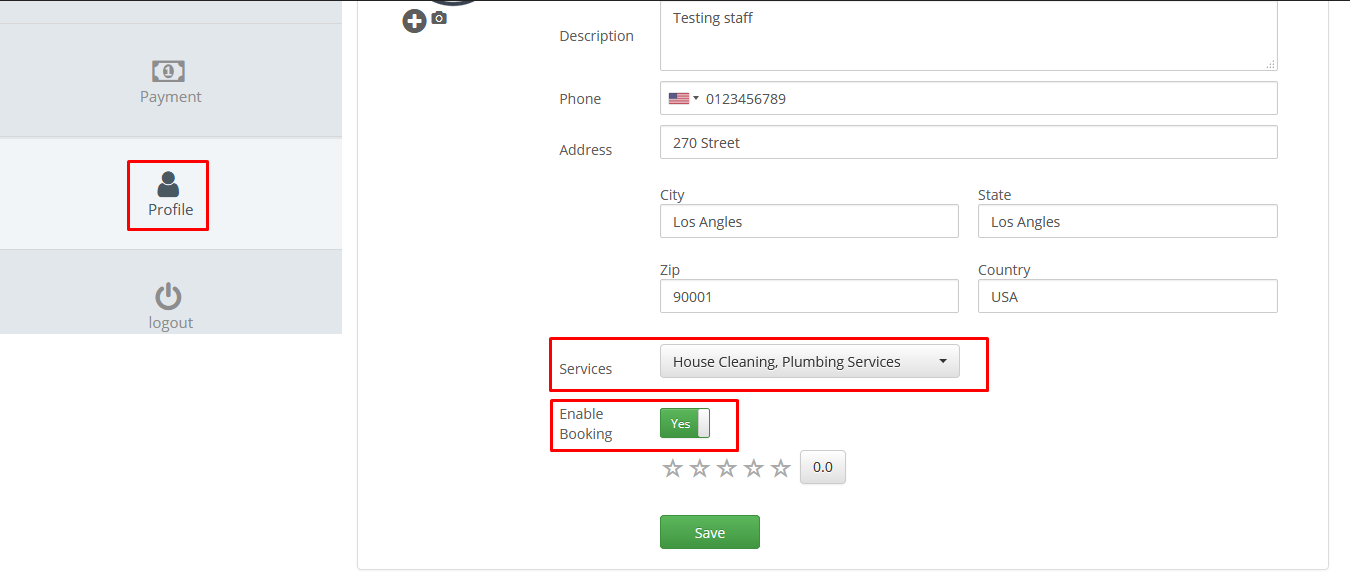
Staff can select services which is provided by him/her . Also set his whole profile with enable / Disable option. Also check his whole booking information , Payments , Schedule and etc.
Staff Schedule : Staff can set his own schedule accordingly.
If Staff choose his services on his profile then client will be show when customer choose service for appointment and front calendar update according to staff schedule automatically .
13. Cleanto – Main Features
Cleanto is a PHP script. In current Cleanto provide number of feature for Admin , Customer , Staff . All feature details is below with description.
Google Calendar Integration (2way) : With this feature one can easily set dates, times and reminders for important event/task and integrate them with Google Calendar.
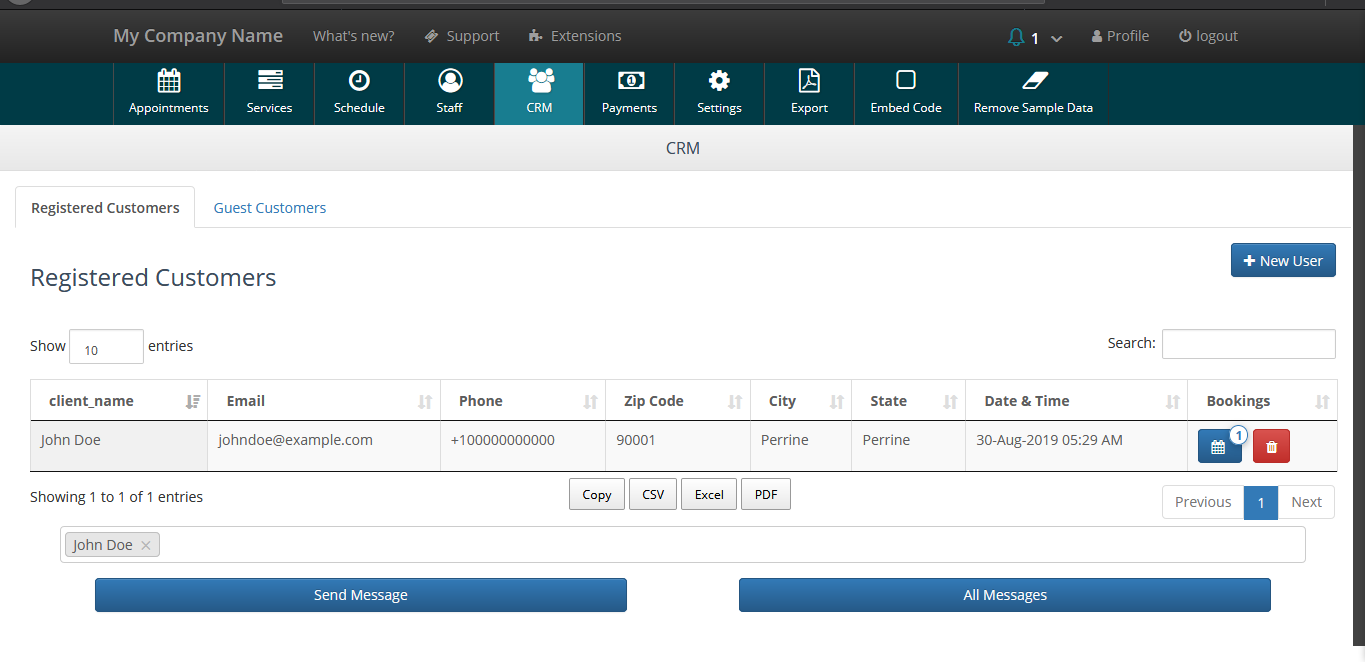
Crm Module : Cleanto lets you manage registered and Guest User's all the personal and booking details at one place.
Extensions : Cleanto's extensions service provide users access to the website's functionality.
Email and SMS reminders : The best Appointment Booking Software offers comprehensive reminder through both SMS and Email. Which leave the Clients in no doubt as to the the details of booking.
Manageable Sms and Email Templates : Cleanto lets you set the SMS and Email format. One can easily change the template according to their choice.
Api : Cleanto provides robust, reliable and secure Mobile Application Integration. Cleanto provide api feature for use Cleanto on Cleanto app for android and IOS.
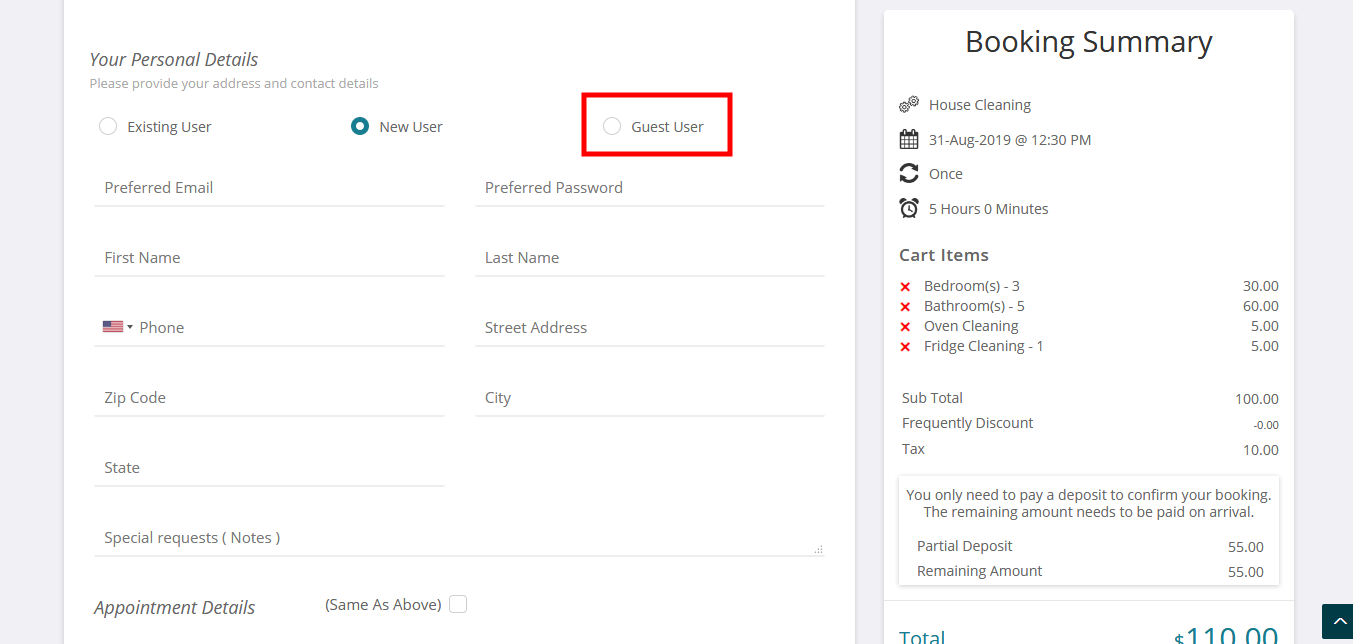
Guest User Checkout : Guest User Checkout is Super fast and convenient for newcomers on your booking page.
Recurrence booking : Cleanto lets you do repeated bookings over a time period. it makes the existing booking recur.
Multi language : Cleanto is fully translated to support all the languages.
Auto update ; Get the best features Always! This feature keeps the application up to date with the latest version. It automatically upgrade to new version.
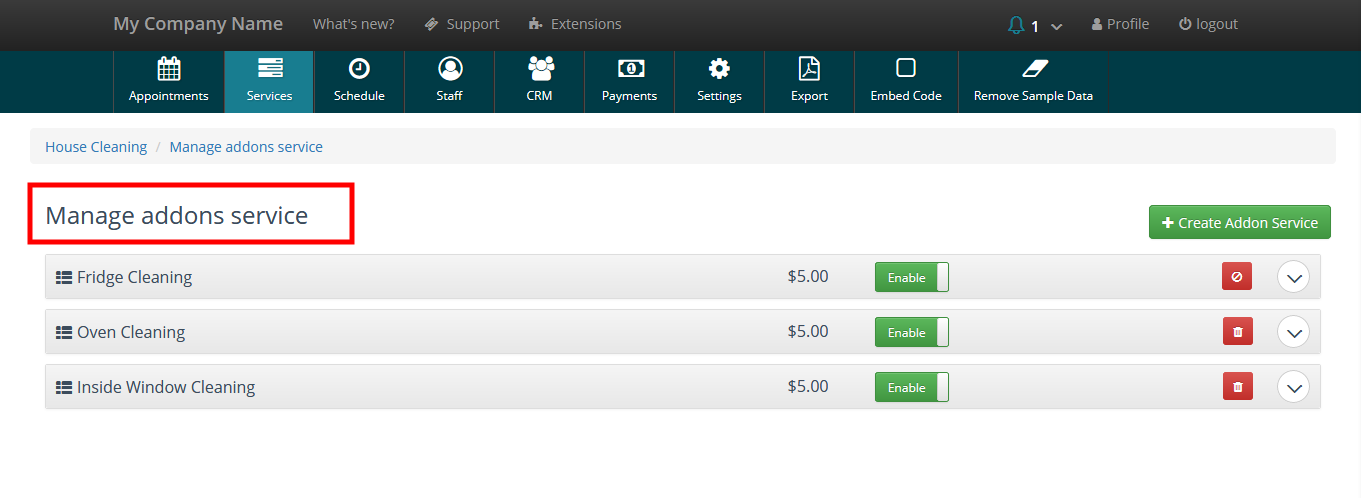
Addon Service : Cleanto lets your customers to add extra services at the time of booking in easy way.
SEO Ready : Cleanto lets you manage SEO settings for your website.
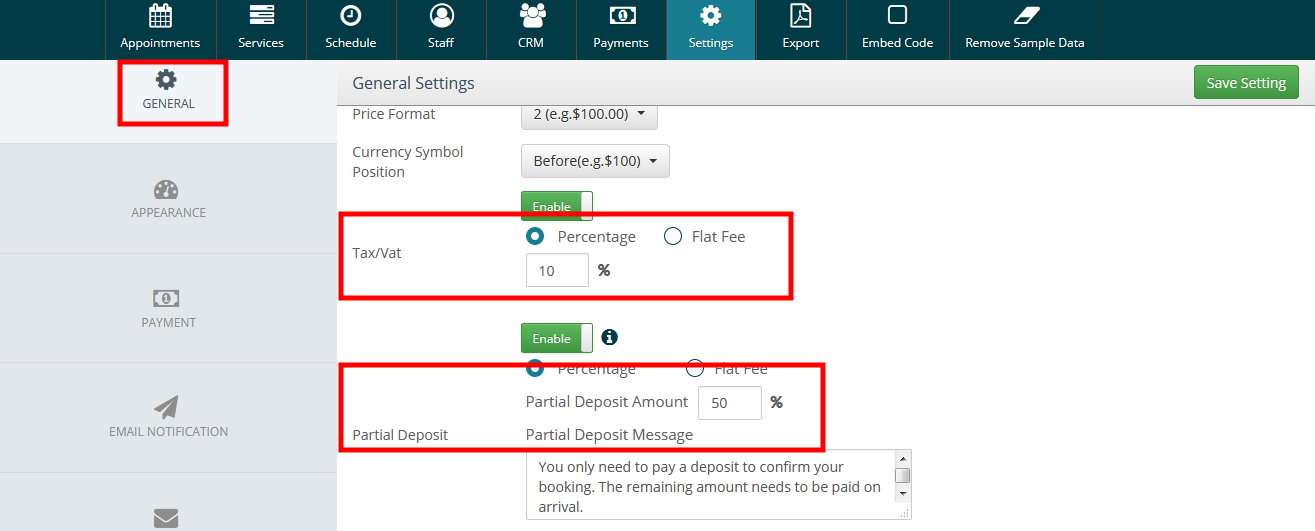
Partial Deposit : Cleanto let you get paid partial deposit option smartly.
Tax/Vat/GST : Cleanto provide you Fast, Easy and Automatic TAX/VAT/GST calculation services to its end users.
RTL Support : It offers RTL support for websites of all the languages. One can easily switch their website to RTL.
Staff Dashboard : Staff can easily manage the details like schedule, payment, booking, personal details, etc at one place.
Embed Code : Get the embed code to shown our booking widget - Cleanto on your website.
Manageable Form Fields : Cleanto lets you enable or disable front booking form fields at one place.
Payment and SMS Gateway : Cleanto provides safe payment and SMS services to its end users. Cleanto has PayPal, Stripe, PayUMoney and twilio, plivo gateway for respective services.
PDF Invoice : Cleanto lets you download the invoice/payment details in PDF format.
Fully Responsive : Cleanto is fully responsive and is designed in such a way that it looks great with every devices and is accessible on all devices.
Export CSV Reports : You can get download various types of reports in CSV format easily from your dashboard.
Single-Page Checkout : Single-Page Checkout is the way you fall in love with it, users can put all the required details on same page till the booking computer.
Easy to Schedule : Appointment booking is super easy and quick. Just few clicks and your work will be done.
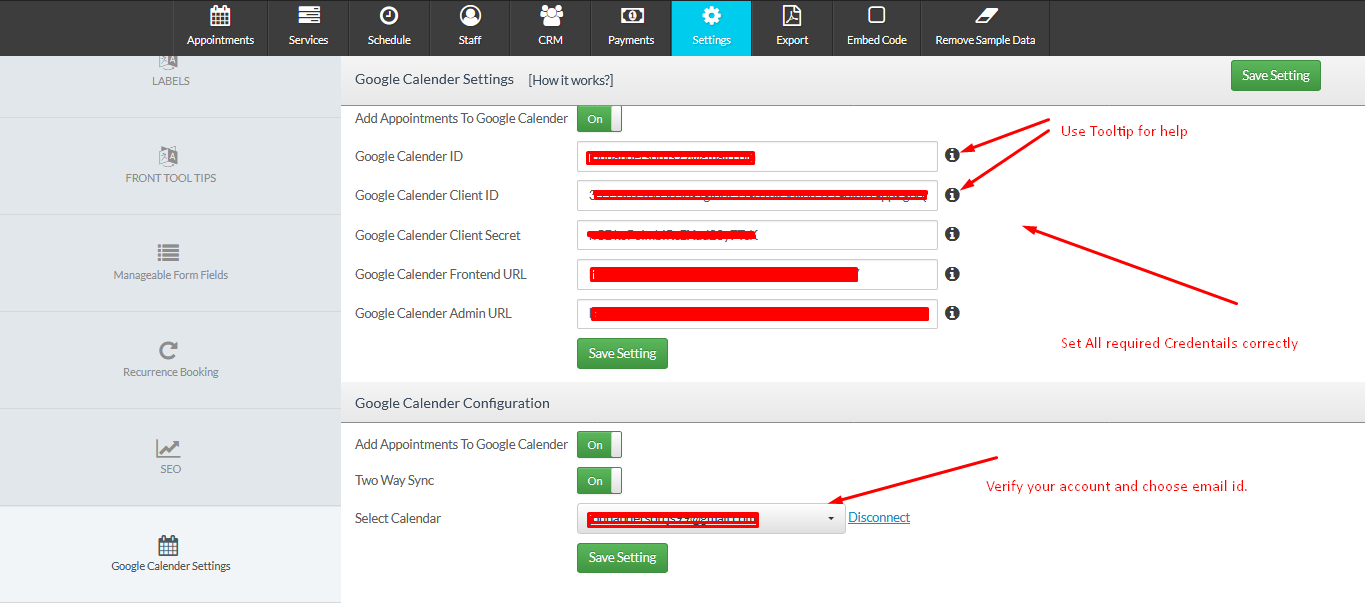
14. How to use Google Calendar in Cleanto?
Steps To Configure Google Calendar Settings
To find your client ID and client secret, do the following:
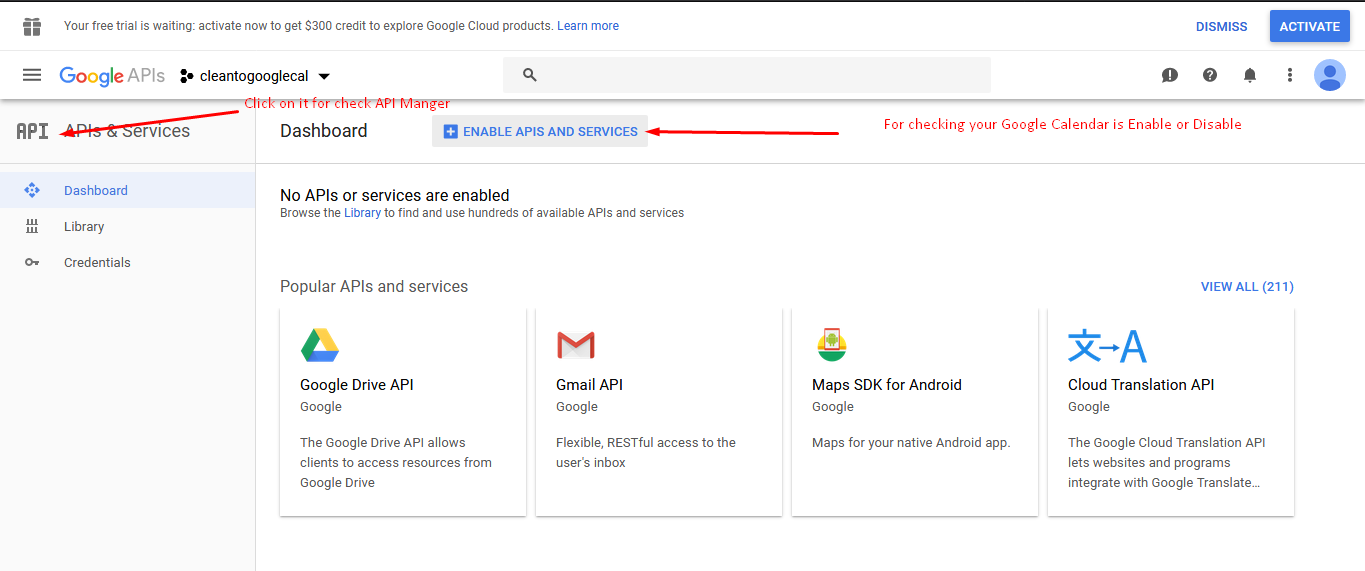
Click in the upper left part to see a sliding sidebar. Next, click API Manager. In the list of APIs look for Calendar API and make sure it is enabled ( If its not enable then enable it first ).
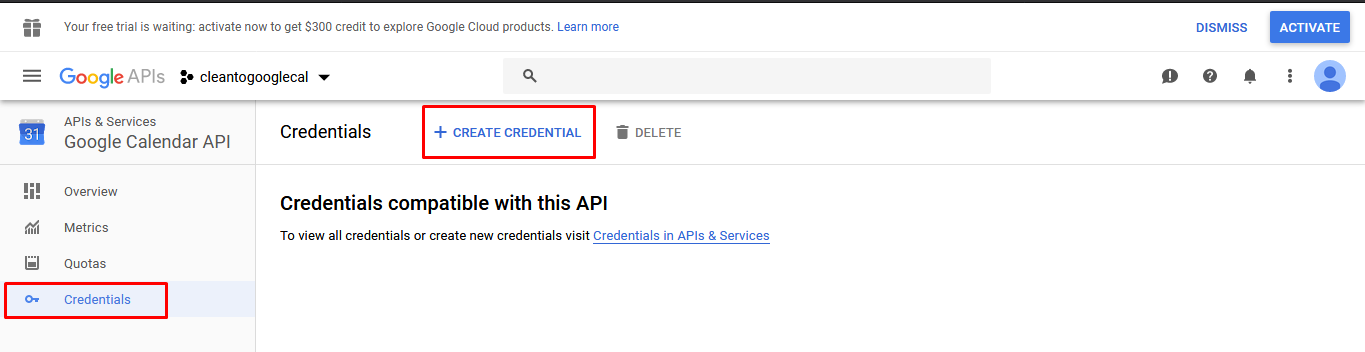
In the sidebar on the left, select Credentials.
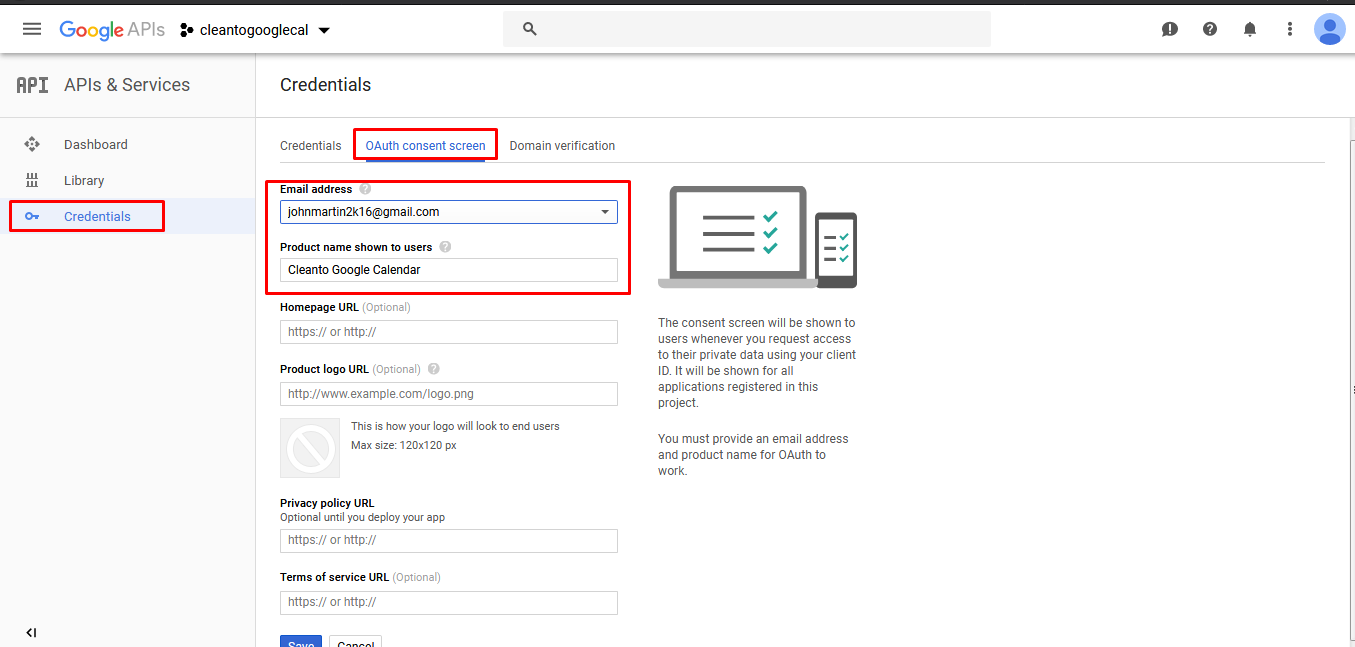
Go to OAuth consent screen tab and give a name to the product, then click Save.
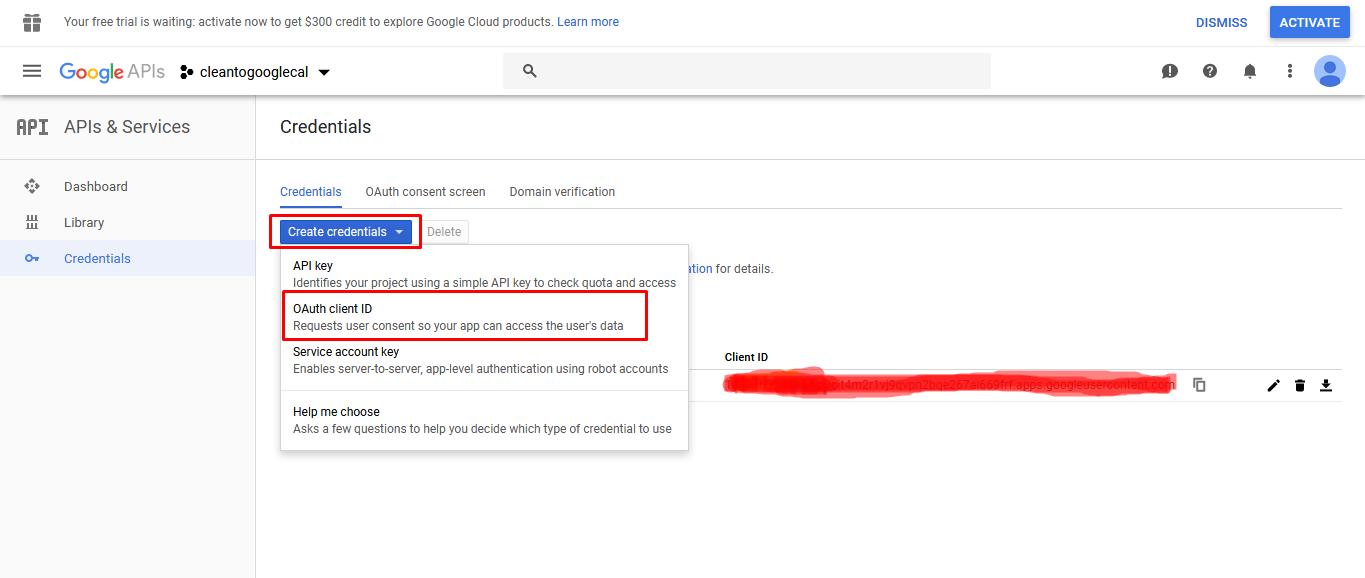
Go to Credentials tab and in New credentials drop-down menu select OAuth client ID.
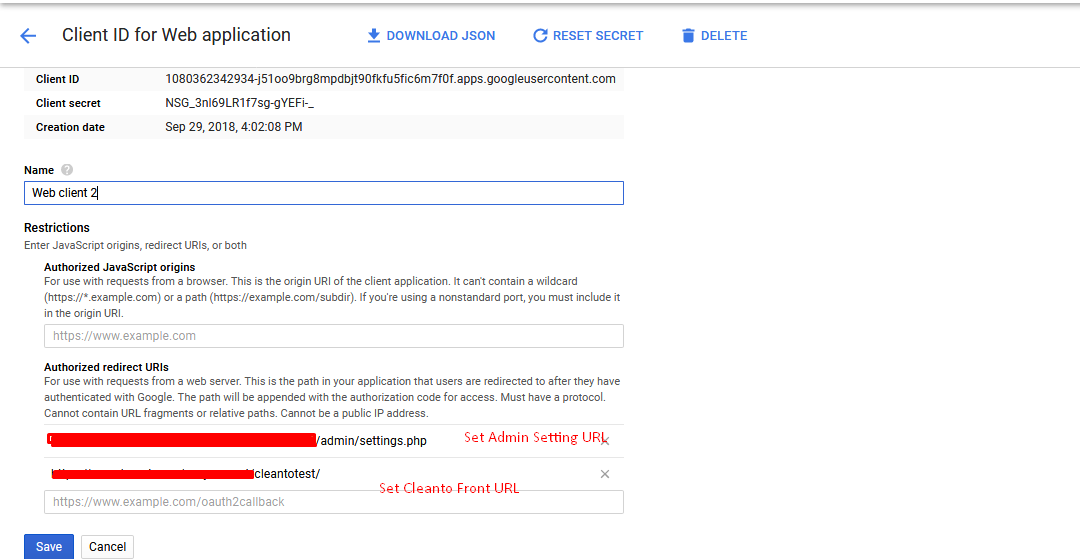
Select Web application and create your project's OAuth 2.0 credentials by providing the necessary information. For Authorized redirect URIs enter the Redirect URI found below on this page. Click Create.
In the popup window look for the Client ID and Client secret. Use them in the form below on this page.
Save Settings and click Verify Account which is located at the bottom of this page.
Let us know if you facing any issue. Thanks
15. Update with New Version
Cleanto provide number of features in current version . One of the main feature is Auto Update provided by the Cleanto. First of all just take backup of old Cleanto files which is on your root path (http://yourwebsite/cleanto/). Just follow the steps to update Cleanto into latest version:
Step 1: Please take backup of your whole Cleanto files and also with database.
Step 2 : If you are using old version then you will see this icon for update version on your admin area header section.
If you are using update version then it will not showing on the top of header.
Step 3: Click on icon for update your version. You will see one popup for latest version with update feature details. Click on Update button and update your version.
Step 4 : It will automatically update your version of Cleanto . But it need to reinstall your Cleanto. Don't worry your previous configuration is save. You no need to update once again your configuration.
Step 5: Choose Update radio button for update your version and then proceed same as like your previous installation process.
Let us know if you facing any issue. Our support team is available for your help.
16. How to use Google Calendar in Cleanto
Google Calendar is a time-management and scheduling calendar service developed by Google. It became available in beta release April 13, 2006, and in general release in July 2009, on the web and as mobile apps for the Android and iOS platforms. Google Calendar allows users to create and edit events.
Cleanto provide Google Calendar feature for easy to handle the appointment by admin.
To find your client ID and Client Secret, do the following :
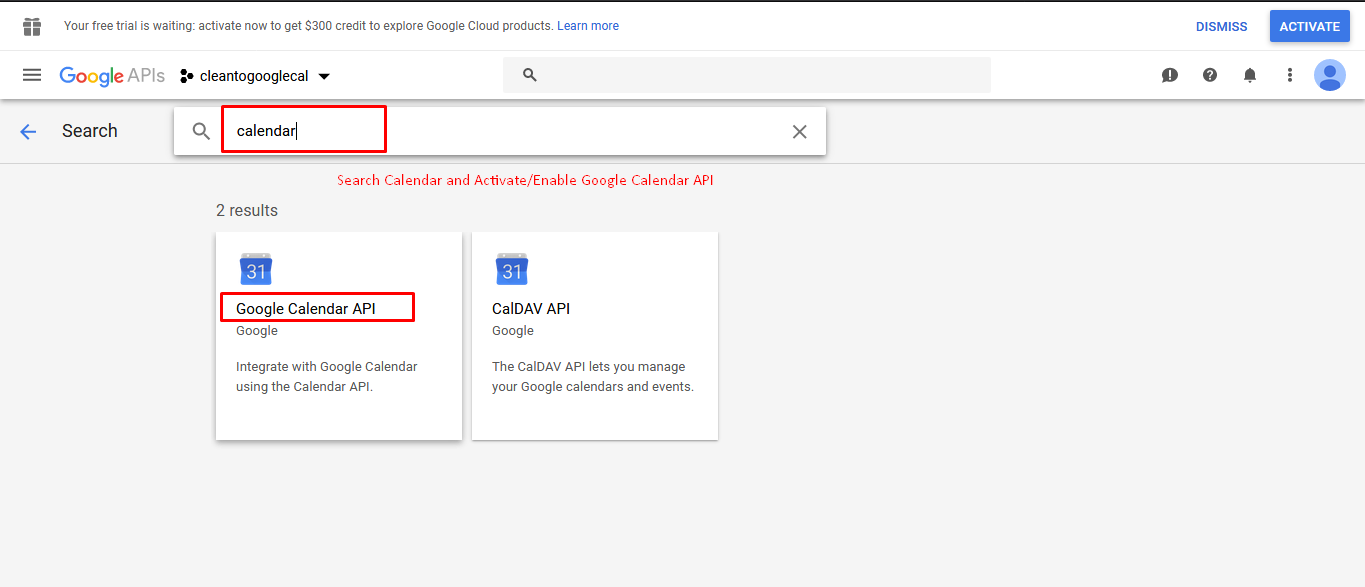
Step 3 : Click in the upper left part to see a sliding sidebar. Next, click API Manager. In the list of APIs look for Calendar API and make sure it is enabled.
Search Google Calendar API and Enable it.
Step 4 : In the sidebar on the left, select Credentials.
Step 5 : Go to OAuth consent screen tab and give a name to the product, then click Save.
Step 6 : Go to Credentials tab and in New credentials drop-down menu select OAuth client ID.
Step 7 : Select Web application and create your project's OAuth 2.0 credentials by providing the necessary information. For Authorized redirect URIs enter the Redirect URI found below on this page. Click Create.
Step 8 : In the popup window look for the Client ID and Client secret. Use them in the form below on this page.
Step 9 : Save Settings and click Verify Account which is located at the bottom of this page.
17. How to use Invite & Earn
Our referral program rewards both the referrer and the referee, please follow simple steps as under to avail the benefits of our referral program:
Step: 1 After logging into your account please go to “Settings” section and click on “Manageable Form Fields” option.
Step: 2 In Manageable Form Field you are provided with Wallet Section which is disable. Make it Enable to facilitate with earn value since earn amount is deposited in Wallet.
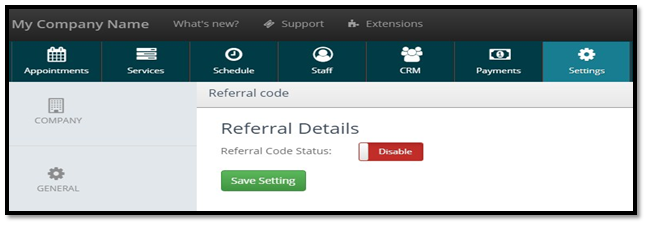
Step:3 Next step is you need to select option “Referral Code” in Settings section only. You need to enable Referral Code Status which is already disable.
After enabling it you will be provided with two options – (a) Referral Code Value and (b) Refer Code Value. Admin can set this referral code value and refer code value as per their own desired value. Referral code value is for the person who you need to invite and earn and he/she will use your referral link. Whereas, the refer code value is for the person who will be using this referral code.
In this context we have set Referral Code value = 30 and Refer Code = 15
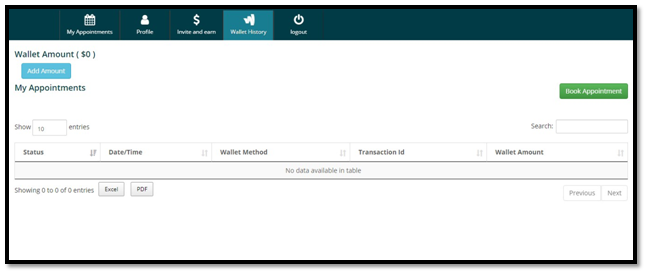
Step: 4 Now when your customer makes fresh booking and check his/her wallet history it will be $ 0 for each fresh booking.
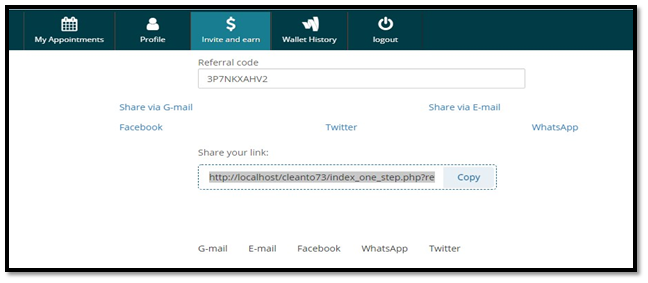
Now to invite & earn the user needs to copy the link as specified in invite and earn and can send to his friends/relatives so that both the parties get benefit of Invite & Earn.
You can share your link via mail, Facebook, Twitter or on WhatsApp. Now to get benefit of Invite & Earn copy and share the link with your friend/relative, now let your friend/relative use that link for booking purpose as show below:
After filling all necessary details regarding bookings, since now your friend/relative is having referral code they need to put that code and click on Apply to avail the facility of Invite & Earn.
Step:5 Now in account of the person the Wallet Amount will be $15 since they used referral code provided by his/her friend/relative.
Similarly, you can Invite & Earn with sharing the link among your friends & relatives.
Step:6 Now the Wallet amount of the person who shared the link for Invite & Earn will be $ 30 which was initially $ 0.
So in this way you can get benefit of Invite & Earn.
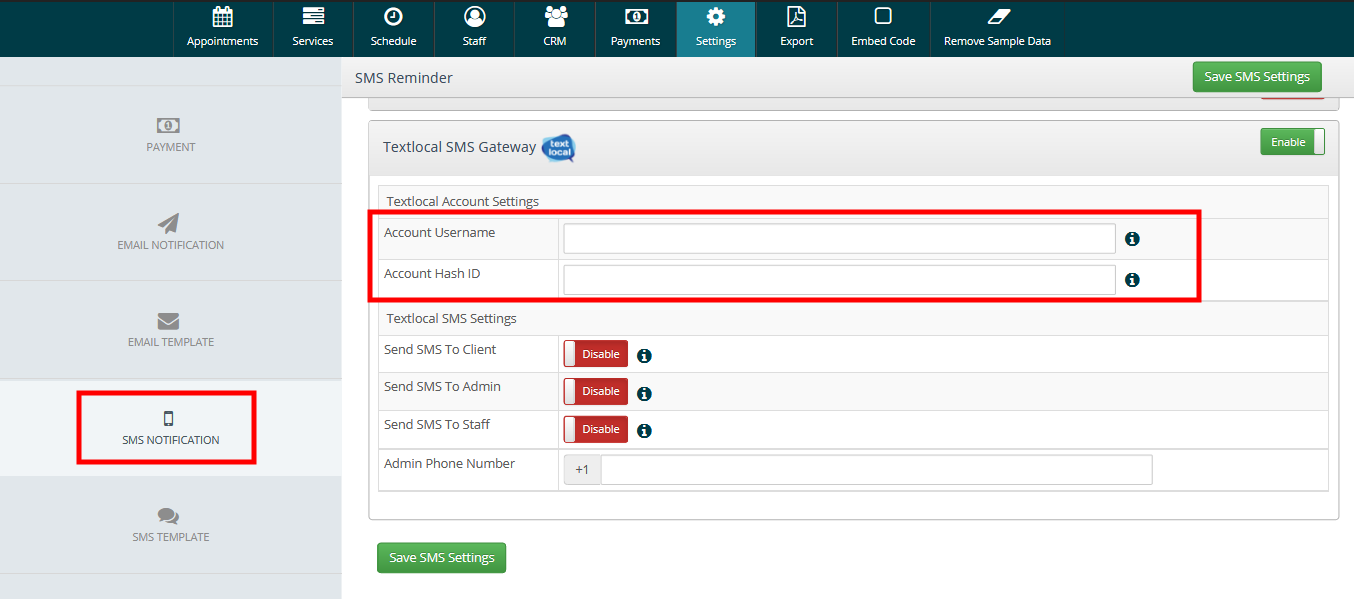
18. How to use TextLocal in Cleanto?
Creating your API key
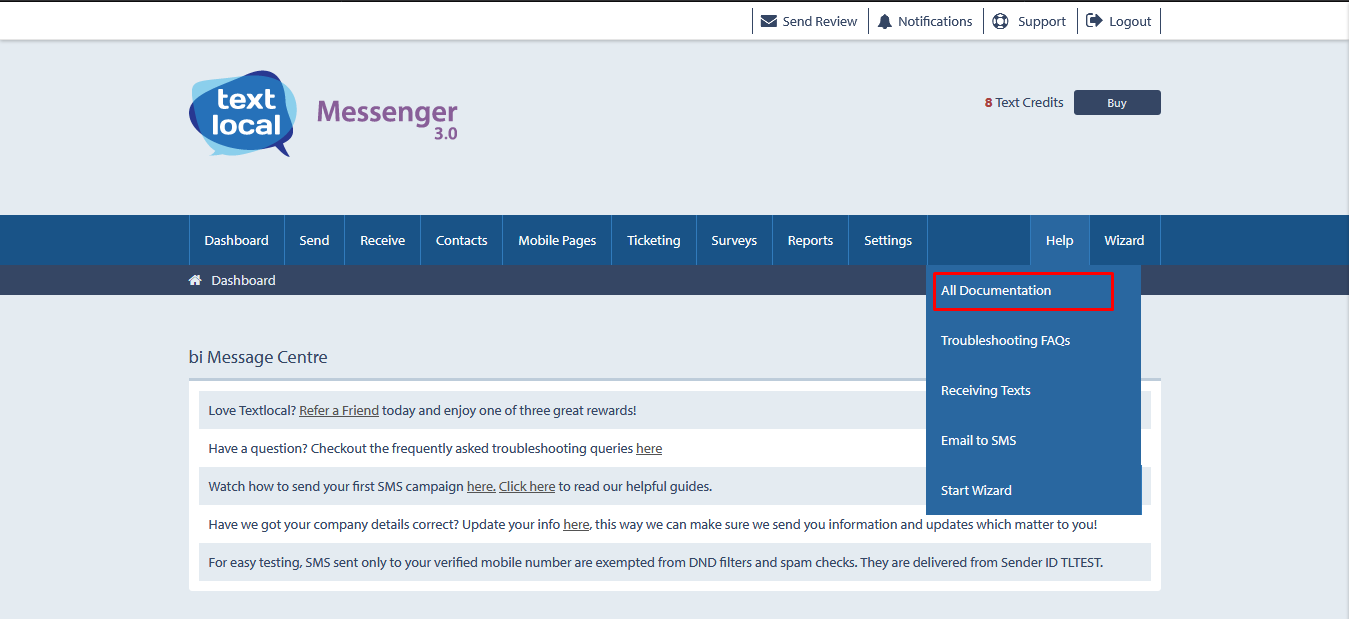
Log in to your Textlocal account.
Navigate to help > All documentation > API Hash Id.
Scroll Down and here you will get your Hash ID/Key. Copy Hash id and save for future and going to Laundry Admin Settings.
Put your email id on your Account Username and Paste hash id which you have copied in Textlocal login area.
Authorize.Net is a United States-based payment gateway service provider allowing merchants to accept credit card and electronic check payments through their website and over an Internet Protocol (IP) connection.
We are providing Authorize.Net payment gateway in Cleanto. You can easy to use and manage using with Authorize.Net in Cleanto. Please follow the steps and activate/enable Authorize.Net in your instance.
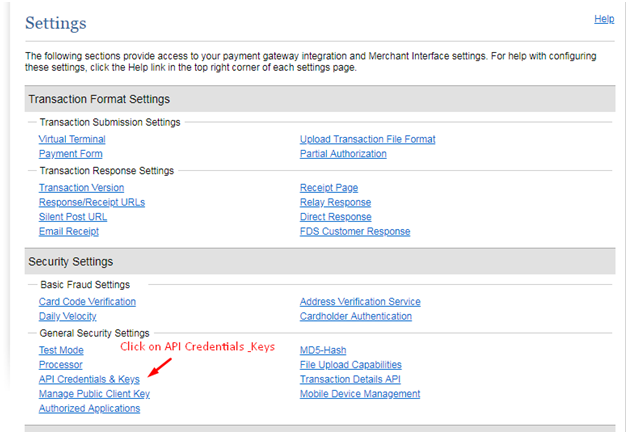
Step by Step guide for Enabling Authorize.Net payment gateway
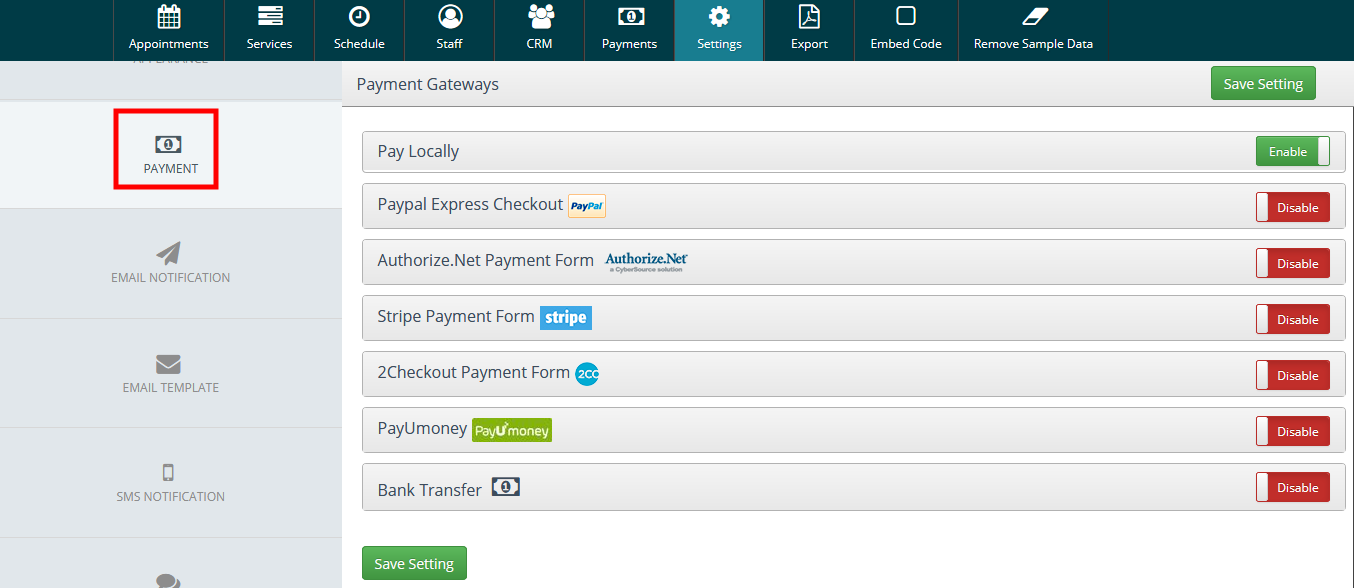
Step 1: Going to payment tab in setting section and enable Authorize.Net Payment gateway which is by default disable.
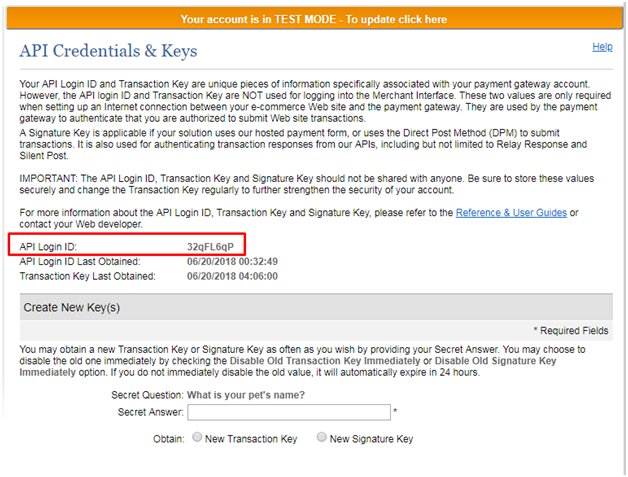
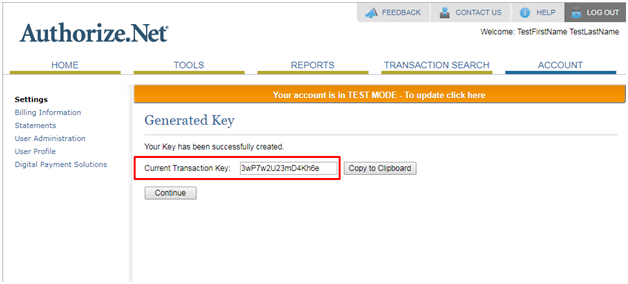
Step 2: Fill all the required information regarding payment gateway. After putting the API and Transaction Key (If you have not any knowledge regarding required fields then please follow next step and check how to get api credentials in Authorize.Net account).
Option to change the google fonts for front booking is added
Methods,Units and addons are sortable now
Language selection dropdown in front booking is added
Made all booking form fields manageable
Assign an appointment to staff feature added
Payment details of the staff is added
Postal code placeholder is added
Option to upload favicon is added
Booking Calendar Js effect is added on date selection
Email templates are imrpoved
Users table data structure is improved
Version 1.6
PayUmoney payment gateway added
Textlocal SMS gateway added
Payment method bank transfer added
Service description made manageable
Form Field \'How we will get in\' made manageable
country code with flag made manageable
Booking Notification design issue fixed
Iframe full height scroll fixed
Internet Explorer 11 browser design issue fixed
Authorize.net payment gateway issue fixed
Version 1.5
Nexmo sms gateway added
Company logo manageable from admin
Installer Script added
New Labels added
Option to delete registered customers added
Company address for booking page visible/hide option added
Zip code dynamic for booking page visible/hide option added
Login and Booking page background manageable added
Existing and new user booking enable disabled from settings
Tooltip added for description in booking page
Tooltip for calendar display available slots
Company logo visible/hide option added
Reset button functionality fixed while adding addons
Prevent booking without login fixed
Frequently discount issue fixed
Update and insert conflication get solved in promocode
PDF invoice for displaying long text fixed
Country code uneditable manually fixed
Display of tax/vat in payment listing fixed
Working of save monthly schedule type fixed
Display of add break tab in schedule tab fixed
Off times in front panel in calendar time slots fixed
Display of expiry date while adding coupon fixed
Notifications count issue on dashboard fixed
Embed Code white space issue fixed
Language translatable issue fixed
Specific mobile view design issue fixed
Version 1.4
2checkout payment method added
Postal Code Enable/Disable option added
Wild card postal Code or zip code option added
Upload image errors fixed
Start time should be smaller than end time issue fixed
Units and addons duplicate names conflict fixed
While adding addons, multiple Quantity option fixed
Notification popup issue fixed
Stripe user email information issue fixed
Overbooking issue on already booked slots fixed
Js issue fixed while addon Multiple Quanity in Addons
Booking time in email template issue fixed
PDF Invoice empty method issue fixed
Postal code validation improved
Service page labels improved
Data table download reports improved
Loading image added for payment option pages
Notifications design Improved
Display message on adding and deleting offdays
Display transaction id in payment listing for pay at venue option
Displayed AM/PM in capitals
Enabled froentend design option even with single unit
Version 1.3
Stripe payment method added
RTL Support added
Manageable SMS templates added
Twilio SMS gateway added
Plivo SMS gateway added
Manageable Email templates added
Admin menu design improved
Email Template design Improved
Dynamic timezone while configure
Whats new section added
Manage vacuum & parking status according to settings
Default country code in profile fixed
Forget password for admin and client email notification fixed
Cancellation policy in frontend sync with admin setting fixed
Notification booking status displaying fixed
Version 1.2
Language settings issue fixed
PDF Invoice labels issue fixed
Calendar date selection issue fixed
All placeholders made translatable
Version 1.1
Multi language feature added
Authorize.Net Payment Gateway added
New default image option in add-ons services added
Remember me password feature is added
Custom css feature added
Default country code option from admin added
Default flag selected in user registration added
Service add-on add new pricing rule improved
Sample data functionality improved
Admin profile validation improved
Validation error messages improved
User details display improved
Discount calculations issue fixed
Add-ons selection issue fixed
Date issue fixed in calendar
Availability time slots issue fixed
Version 1.0
Initial release
22. Shortcode or embed code in wordpress
Is this product having any easy way to integrate this booking system with my current Wordpress?
Yes,Cleanto is easily useable in WordPress website. You can use Cleanto using embed code in WordPress website. Please follow the following steps to use Cleanto embed code.
Step 1 :- Please upload Cleanto folder with your WordPress files.
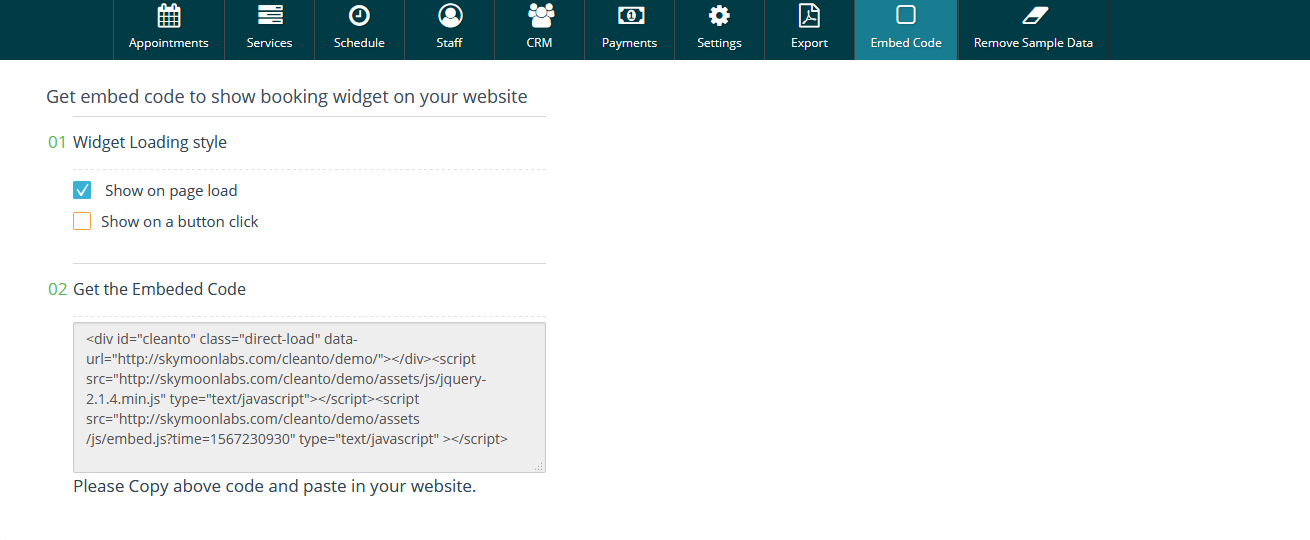
Step 3 :- Please login into your Cleanto admin panel and go to "Embed Code" menu . Choose embed code style which you want to show on your WordPress website. Cleanto have two style of embed code.
First Method - Show on page load (show Cleanto booking form on page load)
Second Method - Show on button click (show Cleanto booking form in popup, on click of button)
Step 4 :- Copy "Get embeded code" textarea area value and paste it in your WordPress page in text mode. That's it!!
Visit your WordPress page and you will be able to access Cleanto into your WordPress website. Thanks
23. Services - Add method, units
Services
Before moving to this section let know the connections between services, methods, units, add-ons.
Let See the flow
You can perform following task on services
How can i add methods for services?
You can add new method for the service by clicking the button of service page
How can i add units for methods ?
You can add new units of methods for the service by clicking the button of in method page as shown above
How can i manage price for my units?
Here you can easily add price for the qty of the units in units page. You will also having options for the calculations to manage price.
What kind of logic is been applied for the calculation how can i know what's the calculations logic for price?
Here we have used simple calculation logic with equal(=) and greater(>) for price.
The calculation logic.
1) if you leave this price part blank it will take multiply the qty with base price
2) if you assign equal then it will take that price.
3) if you use greater then it will assign same price for all remaining qty after that value.
but as soon as it have other value with equal then it will take that value.
EXAMPLE : Suppose you have set base price is 10. we have qty up to 10
Suppose if we have assigned values from admin are as below
Qty Price
1 = 10
2 = 9
3 = 8.5
4 > 7
8 > 5.5
10 = 4
It will treated as below in front
Qty Price
1 = 10
2 = 18
3 = 25.5
4 = 28
5 = 35
6 = 42
7 = 49
8 = 44
9 = 49.5
10 = 40
24. Language Translation
Cleanto is fully translatable. For make Cleanto translatable follow these steps:
Step 1 - At first, You will select required language to display from Settings-> Company.
Step 2 - After choosing preferred language you just need to set Labels (Settings-> Labels), to write your translations.
Step 3 - Select your language to translate the labels.
Step 4 - Now you can change you language labels in right side. Here we show English as default Label. As you change the labels and update, it will show on front, default or unchanged labels will show in English only.
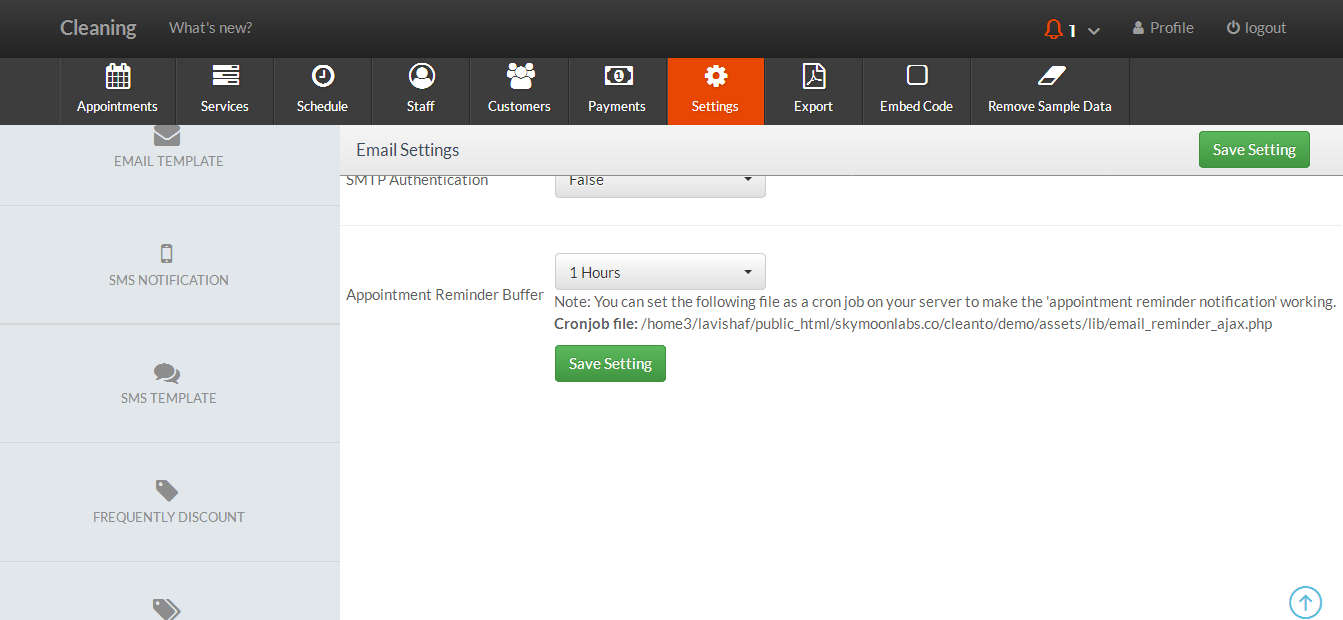
25. Email auto reminder
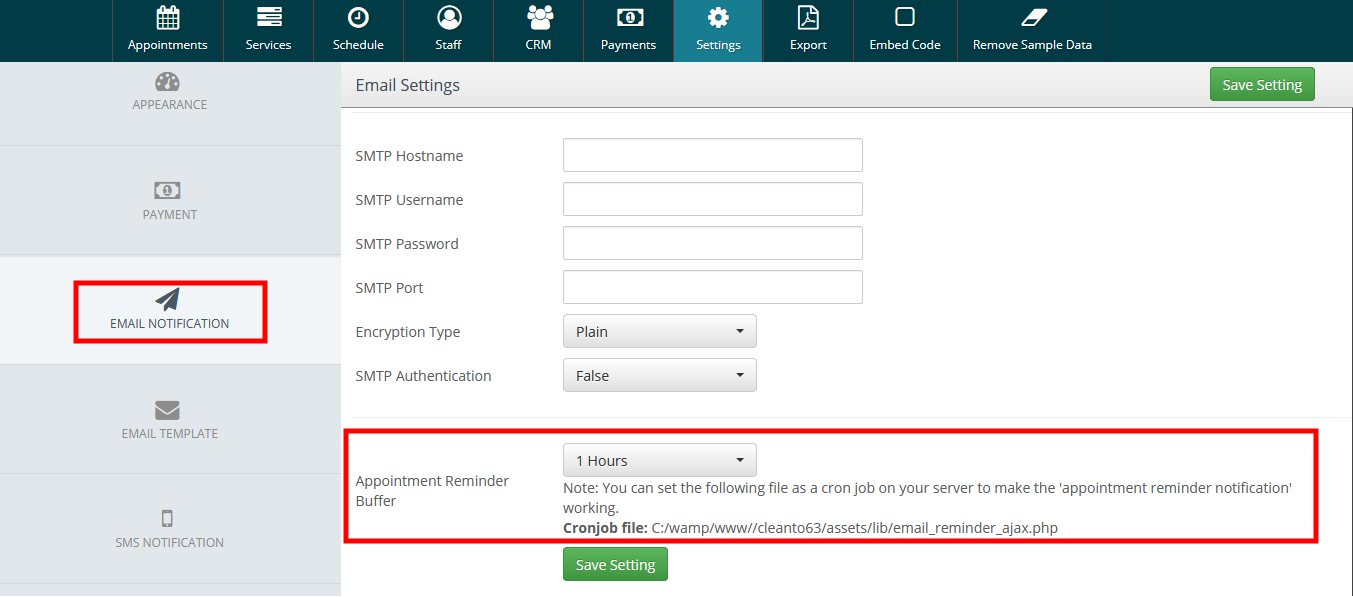
You can set up one email reminder for your business. Most businesses will want to send an email reminder to customers before their appointment starts, which helps to keep customers in the loop and reduce no shows.
Reminders in Timely are completely automated, you just need to turn them on! This guide will step you through the process of getting an email reminder ( Cron Job ) set up.
What are Cron Jobs?
Cron Jobs are used for scheduling tasks to run on the server. They're most commonly used for automating system maintenance or administration. However, they are also relevant to web application development. There are many situations when a web application may need certain tasks to run periodically. Today we are going to explore the fundamentals of Cron Jobs.
This is good to set up automated maintenance and other unmanned server duties. To create a cron job, please do the following:
Step 1: Click on the "Cron Jobs" icon inside cPanel, under Advanced.
Step 2: Select the Common Setting you want. This will automatically change the other time settings.
Step 3: Alternatively, you may adjust the individual time settings. Minute, Hour, Day, Month and Weekday can be modified to achieve your goal.
Step 4: In the input box to the right of "Command", type the name of the file type, then add a space and provide the path ( Cleanto/assets/lib/email_reminder_ajax.php ) to the file which you would like the command to run.
Step 5: Click the "Add New Cron Job" button.
You have just created a cron job to execute a file at a certain time and date with the desired repetition.
Cron jobs are easy to edit and delete.
Click on the "Cron Jobs" icon inside cPanel.
Scroll down to the last section called "Current Cron Jobs".
Find the correct cron job and click either "Edit" or "Delete", under Actions.
Editing does not have the nice automated tools, so it may be easier to copy the Command, delete the cron job, and recreate it.
26. Features - Users
Cleanto provide number of feature for Custom/Users. User feature is given below. Customer/User can automatically create his account while his first booking. Note: if customer choose Guest user then no separate login generate while booking.
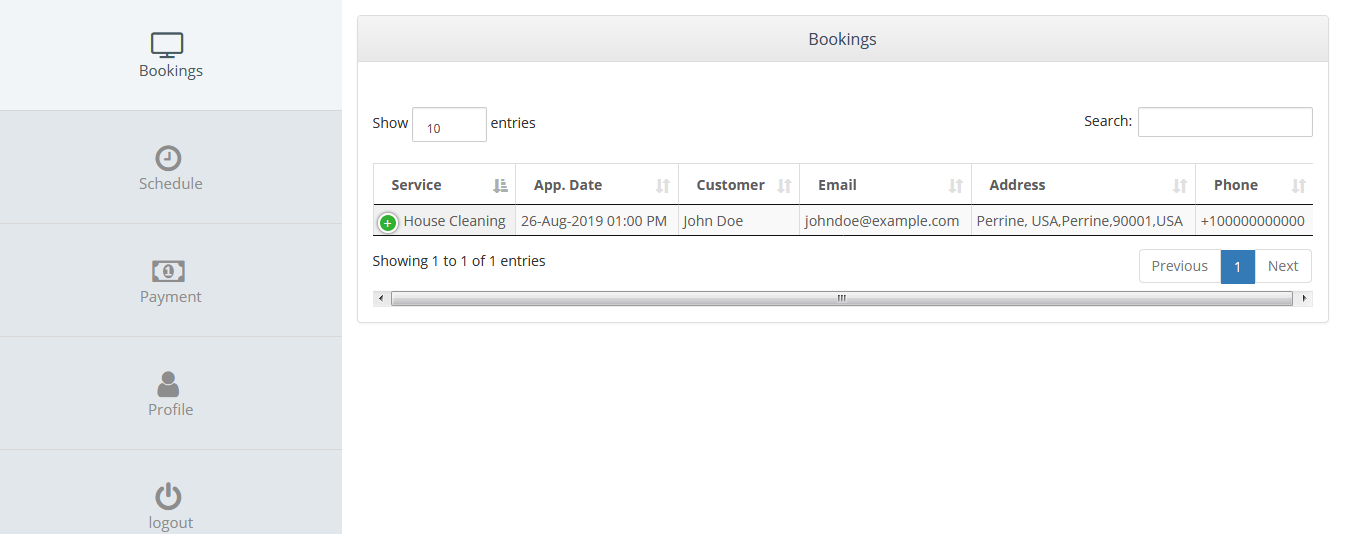
My Appointments : User can check his whole appointments with using his login access.
Also client
Also user have a option for cancel and reschedule appointment. ( its depend upon admin settings for cancellation policy )
Profile : User can change his profile details accordingly ex. Name , City , State , Forgot Password and etc.
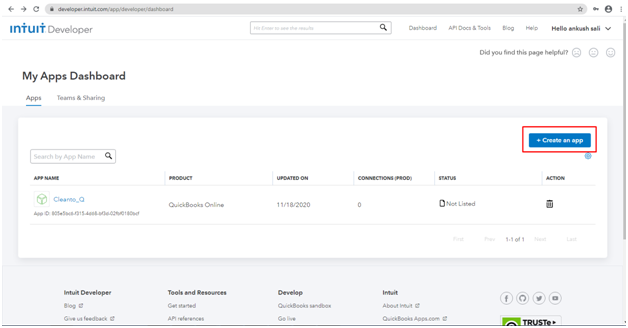
Step - 1: Go to the dashboard and click on "Create an app" button which highlighted red in below image.
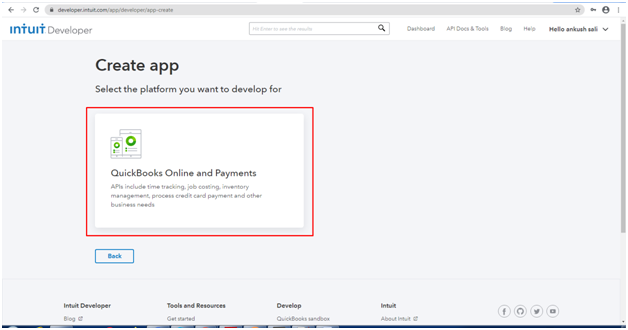
Step - 2: Select the platform you want.
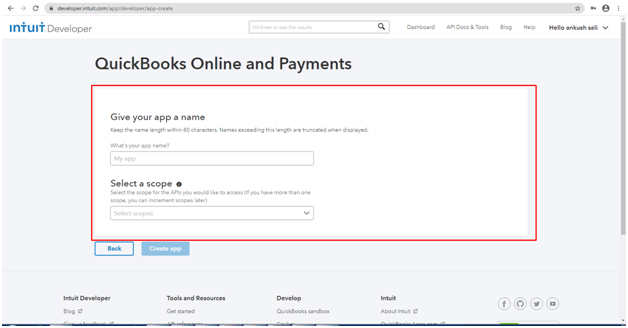
Step - 3: Fill the form with necessary information which highlighted red in below image and click on "Create app" for create a new app.
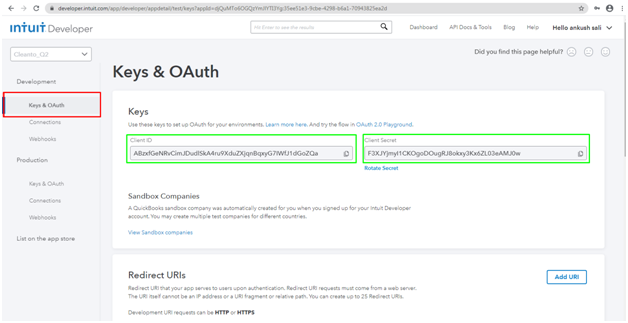
Step - 4: Select red highlighted menu "Keys & OAuth" in below image and save the "Client ID" and "Client Secret" which highlighted green in your doc file.
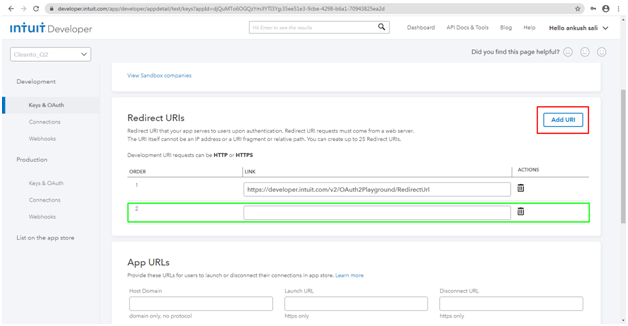
Step - 5: Scroll down on the same page and click on "Add URL" which highlighted in red, Then after you will see the new generated field which highlighted green in below image. Add the call back URL.
Callback URL: Your clento url+"/assets/quickbooks/callback.php"
Click on "Save" button which you will find at the end of the page.
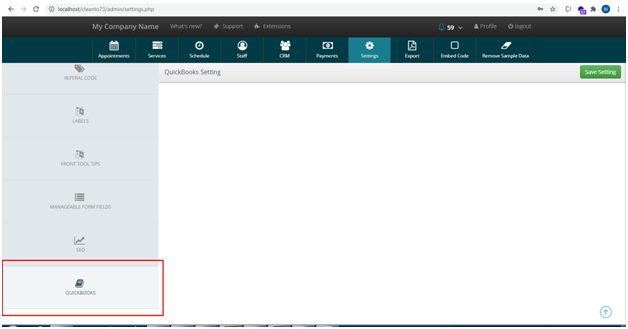
Cleanto Admin Side:
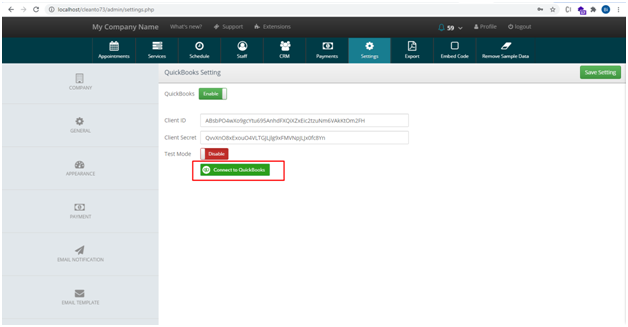
Step 1: Go to on Cleanto admin in Settings menu, scroll down and click on the last side menu name "QUICKBOOKS" which highlighted red in below image.
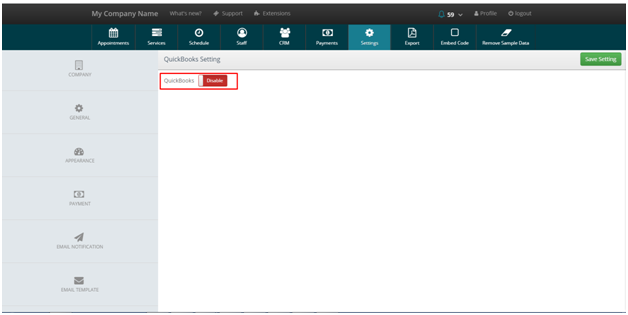
Step - 2: Click on the button which highlighted red in below image to Enable the QuickBooks functionality.
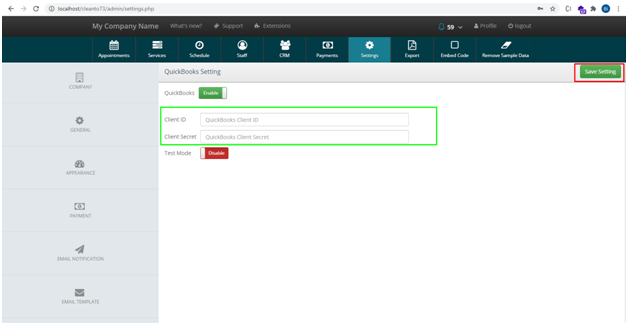
Step - 3: After Enable the QuickBooks, You will see the two blank fields name "Client ID" and "Client Secret" which highlighted green. Fill those fields with Client ID and Client Secret which you have got from QuickBooks when you have created the App. After fill the both fields, Save the Setting to click on the "Save Setting" button which highlighted red in below image.
Step - 4: After save the setting you can see the button name "Connect to QuickBooks" which highlighted red in below image.
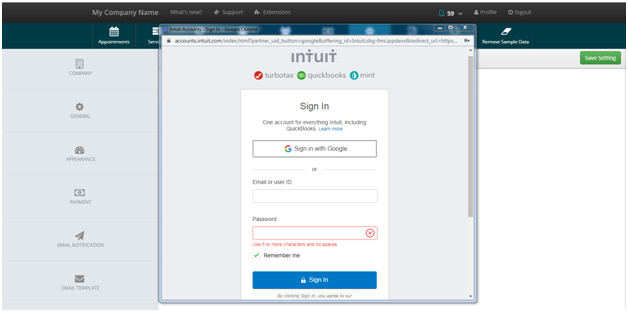
Step - 5: After click on connect button you will see that pop up new window which showing in below image for login into QuickBooks , Login with your QuickBooks credentials.
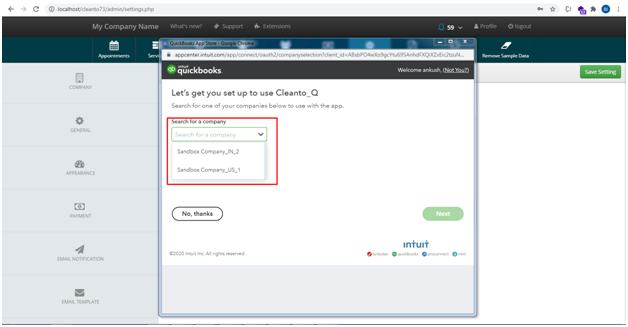
Step - 6: After login successfully, You will redirect on next page of the same pop up window for select your QuickBooks company, select the company from dropdown which showing in below image and click on next button.
If you have only one company in QuickBooks then this step will automatically skip.
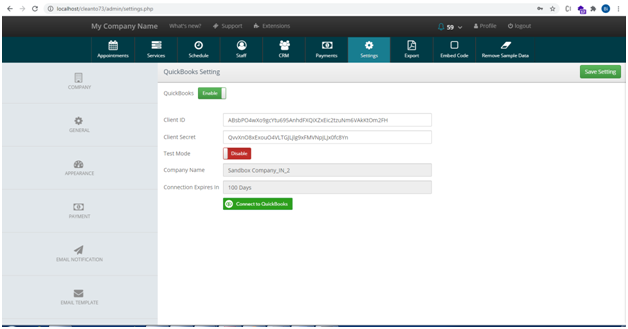
After connection successful, You can see the two new fields in your QuickBooks setting, 1) Company Name and 2) Connection Expires In.
"Company Name" means your connected QuickBooks company, And "Connection Expires In" means the number of days remain to expire your connection.
Basically your connection expires in 100 days, For renew your QuickBooks connection you have to click on "Connect to QuickBooks" button to login and select the company again.
28. Features - Admin
Cleanto provide number of feature in current Cleanto. Almost every feature is available according to appointment system application. Admin feature is given below.
Dashboard : Calendar view to view appointments in calendar View appointments details and manage appointments here.
Services : Services Tab to manage all your services which you
are providing to customers.
Schedule : Admin can set his schedule for take booking from client side. Front end calendar fully depending on your admin schedule settings. Here admin can set slot availability weekly/monthly. also set his Availability , Breaks , Off Time , Off Days
Staff Arrangement : Admin can set whole details of his staff. Customer can select staff while booking or Admin can assign staff while booking confirmation.
CRM : Admin can manage his whole Existing and Guest customer . Also manage his appointments. Cleanto provide spacial SMS and Email feature in CRM area.
Payments : Whole payment details showing here. Admin can manage customer and staff payment here with full details.
Settings: Number of settings provide in current Cleanto. Admin can set Company Profile, General , Appearance , Payment Gateways , Email Settings , Email Template , SMS Reminder , SMS Template , Recurrence Booking , Promocode , Labels , Front Tool Tip , Manageable Form Fields For Front Booking Form , SEO
Export : Admin can export his whole Booking Information , Custom Information , Service Information .
Embed Code : Cleanto provide Embed Code feature for use Cleanto on every platform with using Embed code. Cleanto provide two method for use Cleanto embed code.
Add Sample Data / Remove Sample Data : Cleanto provide Add / Remove Sample Data feature.
29. Cleanto booking form right side default description
</p>
<div class="features">
	<img class="feature-img" src="<?php echo BASE_URL ?>/assets/images/icon17.png" alt="">
	<h4 class="feature-tittle">Saves You Time</h4>
	<p class="feature-text">Lorem Ipsum is simply dummy text of the printing and typesetting industry.</p>
</div>
<div class="features">
	<img class="feature-img" src="<?php echo BASE_URL ?>/assets/images/icon21.png" alt="">
	<h4 class="feature-tittle">Safety First</h4>
	<p class="feature-text">contrary to popular belief, Lorem Ipsum is not simply random text. It has roots in a piece of classical Latin literature from 45 BC.</p>
</div>
<div class="features">
	<img class="feature-img" src="<?php echo BASE_URL ?>/assets/images/icon31.png" alt="">
	<h4 class="feature-tittle">Only The Best Quality</h4>
	<p class="feature-text">It is a long established fact that a reader will be distracted by the readable content of a page when looking at its layout.</p>
</div>
<div class="features">
	<img class="feature-img" src="<?php echo BASE_URL ?>/assets/images/icon41.png" alt="">
	<h4 class="feature-tittle">Easy To Get Help</h4>
	<p class="feature-text">There are many variations of passages of Lorem Ipsum available, but the majority have suffered alteration in some form, by injected humour.</p>
</div>
<div class="features">
	<img class="feature-img" src="<?php echo BASE_URL ?>/assets/images/icon51.png" alt="">
	<h4 class="feature-tittle">Seamless Communication</h4>
	<p class="feature-text">All the Lorem Ipsum generators on the Internet tend to repeat predefined chunks as necessary, making this the first true generator on the Internet.</p>
</div>
<div class="features">
	<img class="feature-img" src="<?php echo BASE_URL ?>/assets/images/icon61.png" alt="">
	<h4 class="feature-tittle">Cash-Free Payment</h4>
	<p class="feature-text"> It was popularised in the 1960s with the release of Letraset sheets containing Lorem Ipsum passages.</p>
</div>
<p>
You can modify this default html according to your own requirement. Thanks.
30. How to use Stripe Payment Gateway in Cleanto?
Getting Publishable Key and Secret Key
Login your stripe account .
Select Developers > API keys on the sidebar of the Stripe Dashboard.
On the API tab find the Publishable key and Secret key fields and copy their values.
Paste both keys in your Laundry admin area Stripe settings.
Plivo's SMS API Platform and Voice API Platform enables businesses to communicate with their customers at global scale. Sign up for free now.
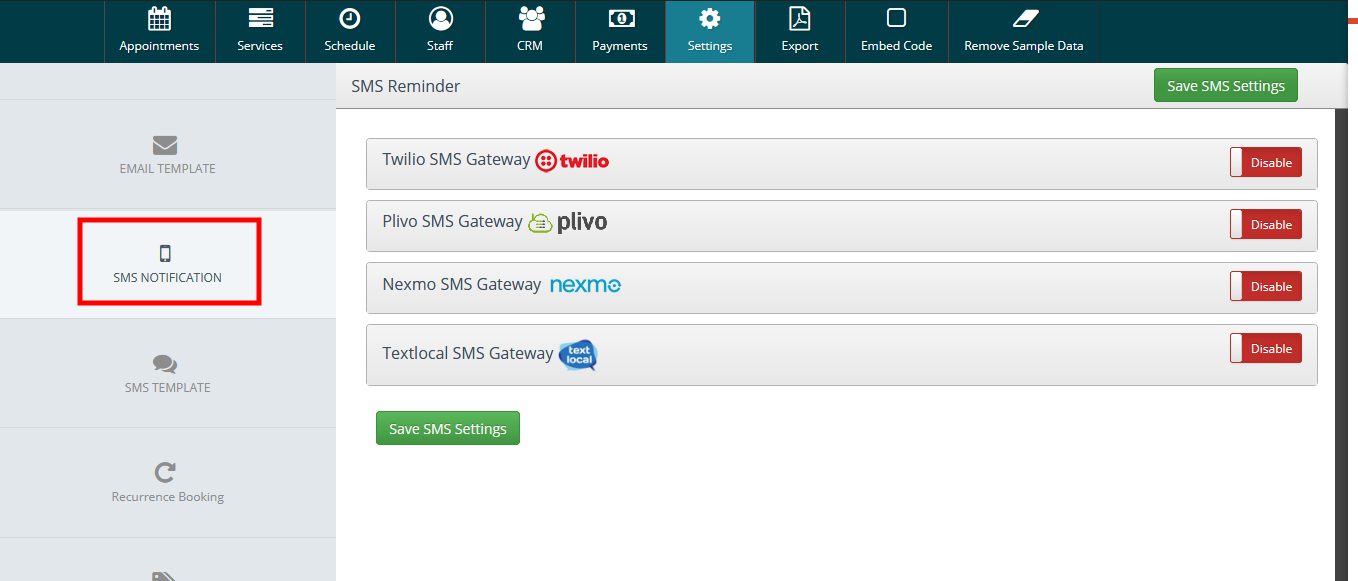
Cleanto provide Plivo SMS gateway service free of cost. We have integrate Plivo in default in our product. Please Proceed the steps and Use Plivo On your instance.
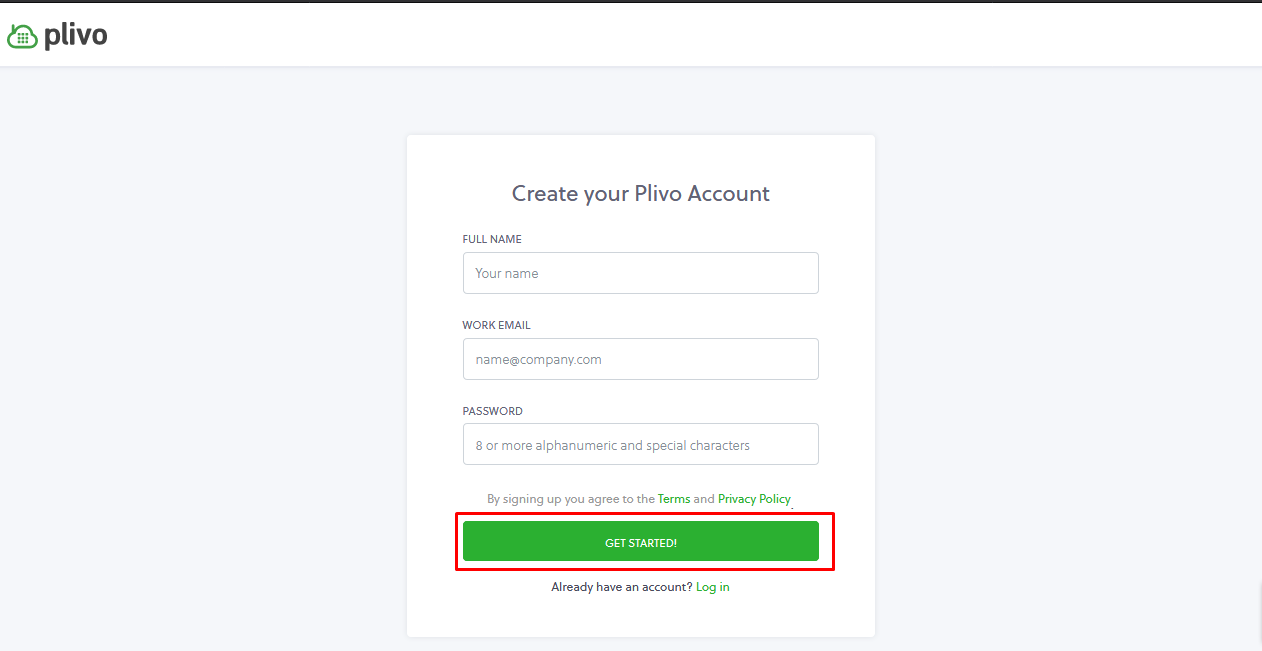
Step 1 : Create your account on Plivo with using this link. If you have already register on Plivo then go to login and access the credentials.
Step 2 : If you are not register then Create your account here.
Step 3 : if you already register then login your account here.
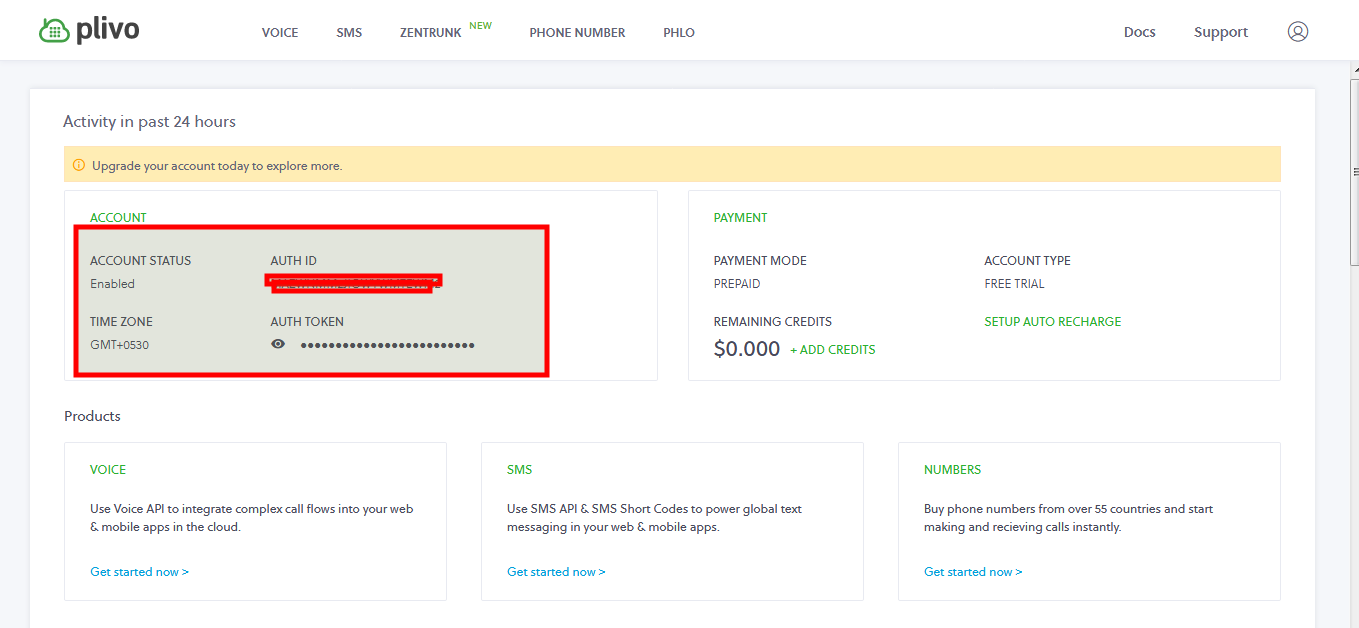
Step 4 : After login you will see your Account SID and Auth Token On your dashboard.
Step 5 : Copy SID and Token and paste in admin area Plivo settings fields. Save and proceed next.
An SMS Gateway enables a computer to send and receive SMS text messages to and from a SMS capable device over the global telecommunications network (normally to a mobile phone). The SMS Gateway translates the message sent, and makes it compatible for delivery over the network to be able to reach the recipient.
Cleanto provide Twilio SMS gateway service free of cost. We have integrate Twilio in default in our product. Please Proceed the steps and Use Twilio On your instance.
Step 1 : Create your account on Twilio with using this link. If you have already register on Twilio then go to login and access the credentials.
Step 2 : If you are not register then Create your account here.
Step 3 : if you already register then login your account here.
Step 4 : After login you will see your Account SID and Auth Token On your dashboard.
Step 5 : Copy SID and Token and paste in admin area Twilio settings fields. Save and proceed next.
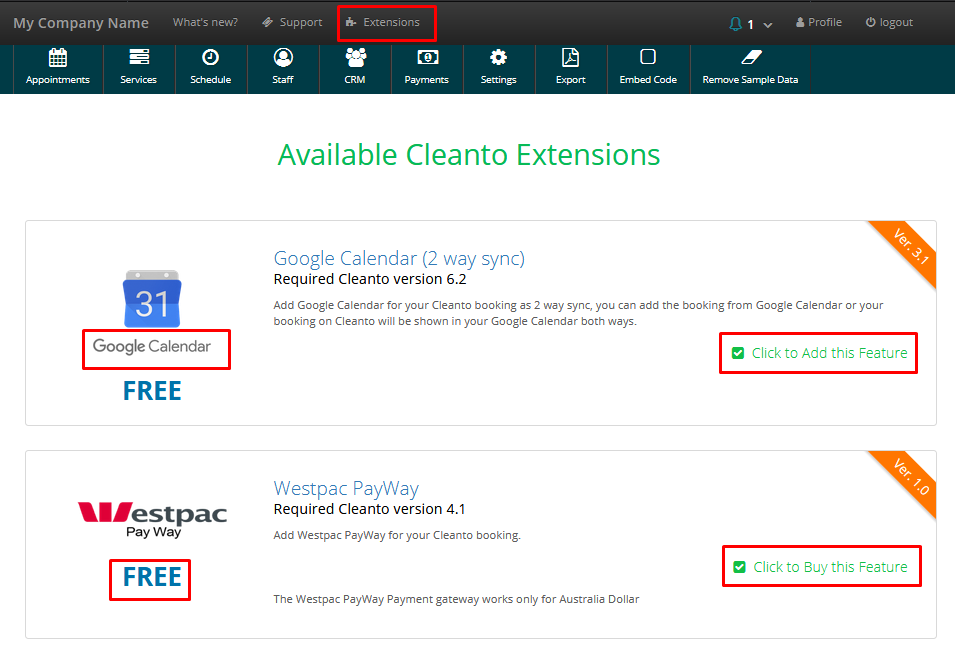
Go to the admin dashboard and click on the Extension menu.
Select your extension you want to add.
Click on "Activate" or "Click to add this feature" button then extension is added in your Cleanto System. Check extension in Cleanto admin settings menu.
34. How to use SMTP for email in Cleanto?
Steps To Configure SMTP Settings
First, You will have to select Email Notification menu in Cleanto settings
We can use email notifications in two ways in Cleanto.
Simple email Notification
In simple email notification, admin email, sender email and sender name have to be set then you get email notification on booking, reschedule etc.
2. SMTP Email Notification
In the SMTP email notification you need to set all the credentials like below image.
-> If you don't know how to obtain SMTP credentials or if you have set up your credentials but are not receiving email notifications, please contact your hosting server. Sometimes email notifications are not received if the email configuration is not set up properly on the server.


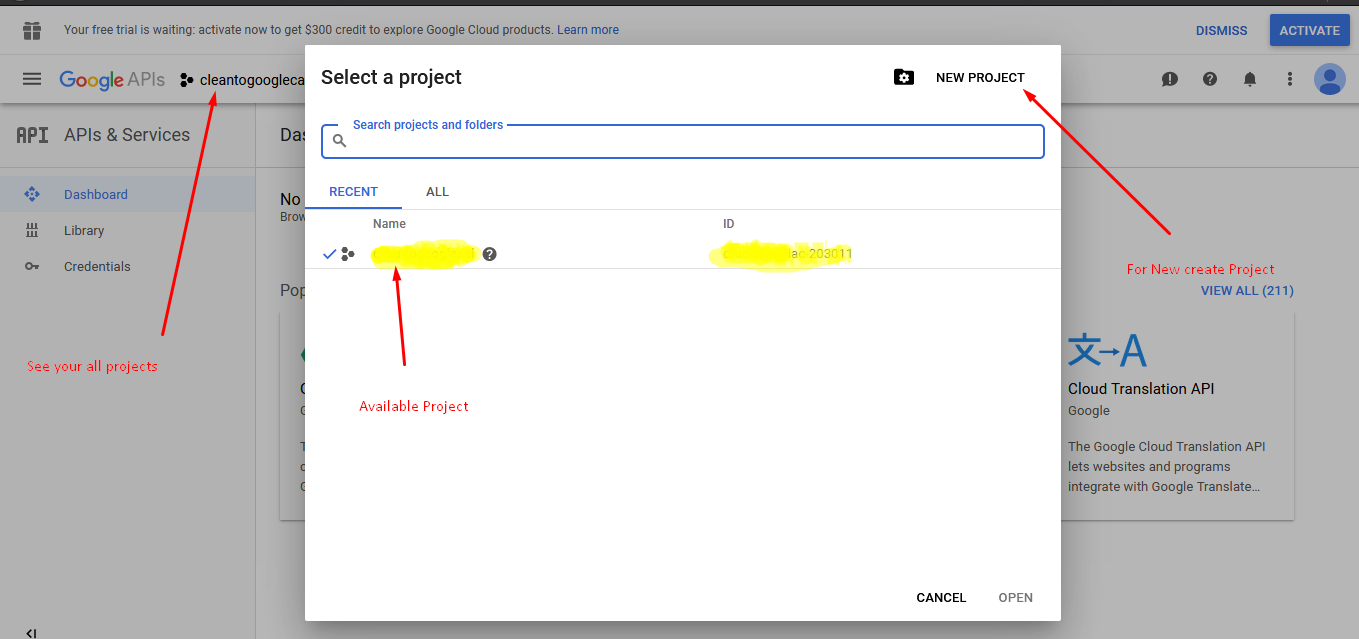
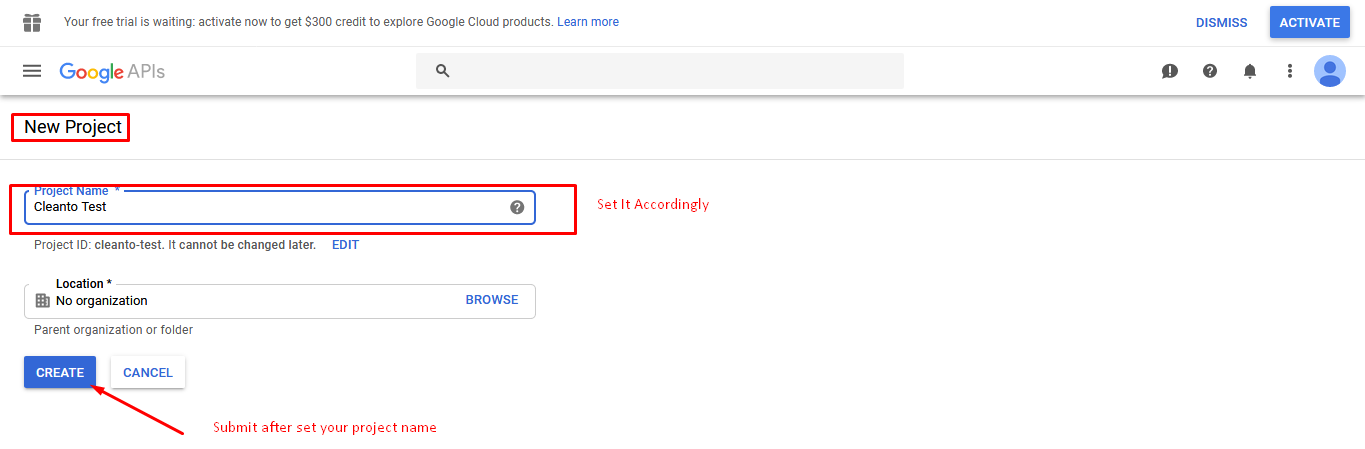
 Create New Project


 Step 3 :- Please login into your Cleanto admin panel and go to "Embed Code" menu . Choose embed code style which you want to show on your WordPress website. Cleanto have two style of embed code.
First Method - Show on page load (show Cleanto booking form on page load)
Step 3 :- Please login into your Cleanto admin panel and go to "Embed Code" menu . Choose embed code style which you want to show on your WordPress website. Cleanto have two style of embed code.
First Method - Show on page load (show Cleanto booking form on page load)