After login or Click On ‘Dig In & Start Testing’ button, you can see your Dashboard Like below shown.
Step 2 : Get Your API Key and Account ID
To Pay with 2Checkout payment acquirer you need to set API Private Key and Account ID. To get your account API Private Key. Go to API --> Settings. Tick on agree to terms for 2Checkout then click on the 'Start Integrating' Button then you will get your Private and Public Key. If you not able to see your Private Key and Public Key generate a new one with 'Generate' Button.For the Account ID click on the user icon on the top right as shown in the screenshot.
Set this Private Key and Account Id into your payment acquirer and get started to payment.
Step 3 : Set Up Return Url.
After the successful completion of a sale 2Checkout.com can return the buyer and sale parameters to a page on your site. Specifying an approved URL at the account level will direct all buyers to the same URL after a successful checkout. This URL can be entered on the Site Management page by clicking the Account tab followed by the Site Management sub-category.
Step 4 : Create User For API Access
Crate one API access user for get access inapi calls. there is alredy one user having Seller area access. you have to create new one for api access. For Create Username Go to Account-->User Management-->Create Username.
Is this product having any easy way to integrate this booking system with my current Wordpress?
Yes,Laundry is easily usable in WordPress website. You can use Laundry is using embed code in WordPress website. Please follow the following steps to use Laundry embed code.
Step 1 :- Please upload Laundry folder with your WordPress files.
Step 3 :- Please login into your Laundry admin panel and go to "Embed Code" menu . Choose embed code style which you want to show on your WordPress website. Laundry have two style of embed code.
First Method - Show on page load (show Laundry booking form on page load)
Second Method - Show on button click (show Laundry booking form in popup, on click of button)
Step 4 :- Copy "Get embeded code" text-area area value and paste it in your WordPress page in text mode. That's it!!
Visit your WordPress page and you will be able to access Laundry into your WordPress website. Thanks
4. Features - Users
Laundry provide number of feature for Custom/Users. User feature is given below. Customer/User can automatically create his account while his first booking. Note: if customer choose Guest user then no separate login generate while booking.
My Appointments : User can check his whole appointments with using his login access.
Also client
Also user have a option for cancel and reschedule appointment. ( its depend upon admin settings for cancellation policy )
Profile : User can change his profile details accordingly ex. Name , City , State , Forgot Password and etc.
5. Appointments Calender
Appointments Quick view is helpful to check all quick pending actions that you need take as an administrator or service provider. This show Past Appointments and Upcoming Appointments, The Admin can either Confirm , Reject, Delete , Reschedule and cancel the appointment on Appointment Calendar.
Also Laundry have provide different-different view for seeing whole appointments. Also get notification for each new booking/appointment.
6. Features - Admin
Laundry provide number of feature in current Laundry. Almost every feature is available according to appointment system application. Admin feature is given below.
Dashboard : Calendar view to view appointments in calendar View appointments details and manage appointments here.
Services : Services Tab to manage all your services which you are providing to customers.
Articles : Laundry provide article for each service. In current version we have provided common article for each and every service. FYI : We
will make manageable in our next update 1.2 version.
Schedule : Admin can set his schedule for take booking from client side. Front end calendar fully depending on your admin schedule settings.
Here admin can set slot availability weekly/monthly. also set his
Availability , Breaks , Off Time , Off Days
Staff Arrangement : Admin can set whole details of his staff. Customer can select staff while booking or Admin can assign staff while booking confirmation.
CRM : Admin can manage his whole Existing and Guest customer . Also manage his appointments. Laundry provide spacial SMS and Email feature in CRM area.
Payments : Whole payment details showing here. Admin can manage customer and staff payment here with full details.
Settings: Number of settings provide in current Laundry. Admin can set Company Profile, General , Appearance , Payment Gateways , Email Settings , Email Template , SMS Reminder , SMS Template , Recurrence Booking , Promocode , Labels , Front Tool Tip , Manageable Form Fields For Front Booking Form , SEO
Export : Admin can export his whole Booking Information , Custom Information , Service Information .
Embed Code : Laundry provide Embed Code feature for use Laundry on every platform with using Embed code. Laundry provide two method for use Laundry embed code.
Add Sample Data / Remove Sample Data : Laundry provide Add / Remove Sample Data feature.
7. Installation & Basic Configuration Guide
Step by Step guide for installation
Buy the system from us and just follow the below steps.
Step 1 : Upload laundry.zip on your website's ROOT directory.
Step 2 : Extract the laundry.zip file and it will create a folder name with laundry on your website's root directory.
Step 3 : Just go to browser and type URL of your website with following text http://yourdomain.com /laundry/ and press Enter key to start to installation process.
Step 4 :Open config file using any FTP tool (http://yourdomain.com/laundry/config.php) fill required veriables for database connection (Host name, Username, Password, Database Name) and Envato Purchase code.After adding just open http://yourdomain.com/laundry again.
Step 5 : After complete all above process you will see the main admin login where you have to enter the email and password saved during installation.
That's all now just see the main admin panel from where you can do manage the product.
8. How to use PayUMoney Payment Gateway in Laundry?
Follow below mentioned steps to easily get your PayUMoney Merchant Key and Merchant Salt Live Credentials :
Step 1: Go to PayUMoney
Step 2: If you have created an account with PayUMoney, login, else Create Account
Step 3:Enter your email address here
Step 4:Once you have logged in into your account, click on Integration Details option under Integration Help
Step 5:Here are your Live Credentials - Merchant Key and Merchant Salt. Copy them
Step 6:Now paste the keys in their respective fields on laundry Admin settings
Authorize.Net is a United States-based payment gateway service provider allowing merchants to accept credit card and electronic check payments through their website and over an Internet Protocol (IP) connection.
We are providing Authorize.Net payment gateway in Laundry. You can easy to use and manage using with Authorize.Net in Laundry. Please follow the steps and activate/enable Authorize.Net in your instance.
Step by Step guide for Enabling Authorize.Net payment gateway
Step 1: Going to payment tab in setting section and enable Authorize.Net Payment gateway which is by default disable.
Step 2: Fill all the required information regarding payment gateway. After putting the API and Transaction Key (If you have not any knowledge regarding required fields then please follow next step and check how to get api credentials in Authorize.Net account).
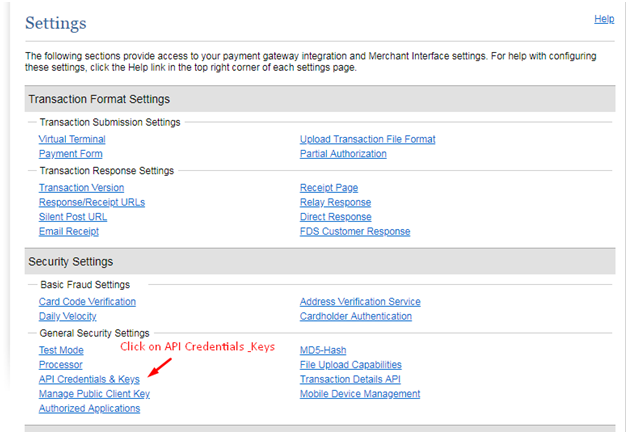
Step 4: After login please going to setting menu in your dashboard.
Step 5: In setting click on API credentials and keys under General security settings.
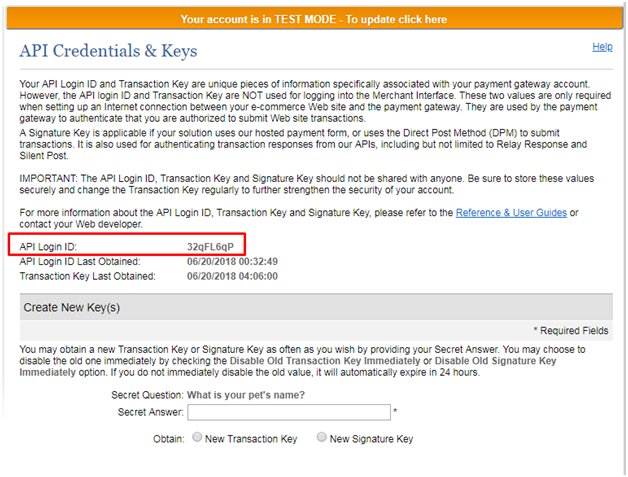
Step 6: Here you will get your API login id.
Step 7: To obtain the Transaction Key provide the security answer and submit.
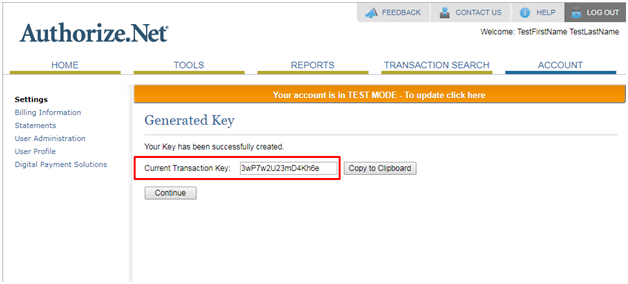
Step 8: You will get the new Transaction Key.
10. Language Switcher For Frontend
Laundry is fully translatable you can translate Laundry into any language. Also Laundry front-end (Booking form) support multiple languages translation at same time. Appoint users can switch front-end into language accordingly. On the top of the booking page user can see number of available languages ( its depends upon admin set language list in admin label area ).
if you want to remove some flag on top of the booking page then follow the path and set it accordingly. Laundry ->Admin->Settings->Manageable Form Fields ( enable/disable accordingly ) . With using this you have hide whole language flag.
If you want to remove some particular flag. Then please follow the path and set it accordingly. With using this option hide particular flag on Booking page screen. Path : Laundry->Admin->Settings->Labels->Choose Language ( Enable / Disable accordingly. )
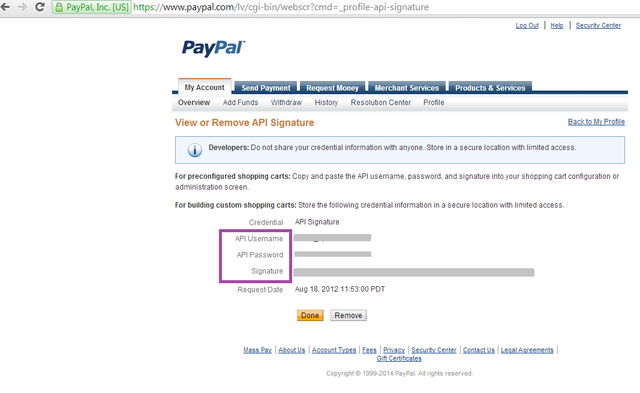
11. How to use PayPal Payment Gateway in Laundry?
Log in to your PayPal Business account.
Click the My Account tab.
Click the Profile tab. If you haven't already done so, you need to verify your account before requesting API credentials.
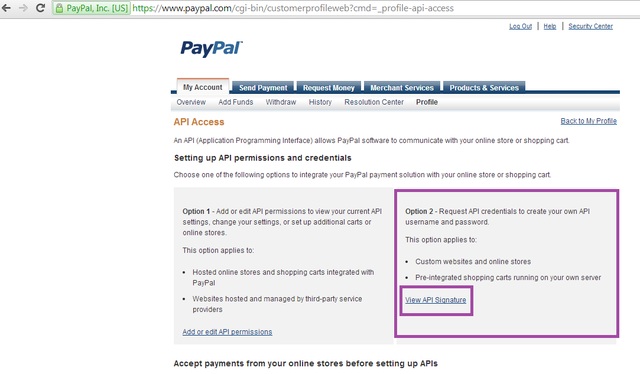
Click Request API credentials under Account information.
Click Set up PayPal API credentials and permissions under Option 1.
Click Request API Credentials.
Click Request API signature.
Click Agree and Submit.
Copy your API Username, API Password and Signature. And page in your Laundry admin area PayPal settings.
</p>
<div class="features">
	<img class="feature-img" src="<?php echo BASE_URL ?>/assets/images/icon17.png" alt="">
	<h4 class="feature-tittle">Saves You Time</h4>
	<p class="feature-text">Lorem Ipsum is simply dummy text of the printing and typesetting industry.</p>
</div>
<div class="features">
	<img class="feature-img" src="<?php echo BASE_URL ?>/assets/images/icon21.png" alt="">
	<h4 class="feature-tittle">Safety First</h4>
	<p class="feature-text">contrary to popular belief, Lorem Ipsum is not simply random text. It has roots in a piece of classical Latin literature from 45 BC.</p>
</div>
<div class="features">
	<img class="feature-img" src="<?php echo BASE_URL ?>/assets/images/icon31.png" alt="">
	<h4 class="feature-tittle">Only The Best Quality</h4>
	<p class="feature-text">It is a long established fact that a reader will be distracted by the readable content of a page when looking at its layout.</p>
</div>
<div class="features">
	<img class="feature-img" src="<?php echo BASE_URL ?>/assets/images/icon41.png" alt="">
	<h4 class="feature-tittle">Easy To Get Help</h4>
	<p class="feature-text">There are many variations of passages of Lorem Ipsum available, but the majority have suffered alteration in some form, by injected humour.</p>
</div>
<div class="features">
	<img class="feature-img" src="<?php echo BASE_URL ?>/assets/images/icon51.png" alt="">
	<h4 class="feature-tittle">Seamless Communication</h4>
	<p class="feature-text">All the Lorem Ipsum generators on the Internet tend to repeat predefined chunks as necessary, making this the first true generator on the Internet.</p>
</div>
<div class="features">
	<img class="feature-img" src="<?php echo BASE_URL ?>/assets/images/icon61.png" alt="">
	<h4 class="feature-tittle">Cash-Free Payment</h4>
	<p class="feature-text"> It was popularised in the 1960s with the release of Letraset sheets containing Lorem Ipsum passages.</p>
</div>
<p>
You can modify this default html according to your own requirement. Thanks.
13. How to use Twilio SMS Gateway in Laundry?
An SMS Gateway enables a computer to send and receive SMS text messages to and from a SMS capable device over the global telecommunications network (normally to a mobile phone). The SMS Gateway translates the message sent, and makes it compatible for delivery over the network to be able to reach the recipient.
Laundry provide Twilio SMS gateway service free of cost. We have integrate Twilio in default in our product. Please Proceed the steps and Use Twilio On your instance.
Step 1 : Create your account on Twilio with using this link. If you have already register on Twilio then go to login and access the credentials.
Step 2 : If you are not register then Create your account here.
Step 3 : if you already register then login your account here.
Step 4 : After login you will see your Account SID and Auth Token On your dashboard.
Step 5 : Copy SID and Token and paste in admin area Twilio settings fields. Save and proceed next.
Laundry is a PHP script. In current Laundry provide number of feature for Admin , Customer , Staff . All feature details is below with description.
Crm Module : Laundry lets you manage registered and Guest User's all the personal and booking details at one place.
Email and SMS reminders : The best Appointment Booking Software offers comprehensive reminder through both SMS and Email. Which leave the Clients in no doubt as to the the details of booking.
Manageable Sms and Email Templates : Laundry lets you set the SMS and Email format. One can easily change the template according to their choice.
Api : Laundry provides robust, reliable and secure Mobile Application Integration. Laundry provide api feature for use Laundry on Laundry app for android and IOS.
Guest User Checkout : Guest User Checkout is Super fast and convenient for newcomers on your booking page.
Multi language : Laundry is fully translated to support all the languages.
Auto update ; Get the best features Always! This feature keeps the application up to date with the latest version. It automatically upgrade to new version.
SEO Ready : Laundry lets you manage SEO settings for your website.
Partial Deposit : Laundry let you get paid partial deposit option smartly.
Tax/Vat/GST : Laundry provide you Fast, Easy and Automatic TAX/VAT/GST calculation services to its end users.
RTL Support : It offers RTL support for websites of all the languages. One can easily switch their website to RTL.
Staff Dashboard : Staff can easily manage the details like schedule, payment, booking, personal details, etc at one place.
Embed Code : Get the embed code to shown our booking widget - Laundry on your website.
Manageable Form Fields : Laundry lets you enable or disable front booking form fields at one place.
Payment and SMS Gateway : Laundry provides safe payment and SMS services to its end users. Laundry has PayPal, Stripe, PayUMoney and twilio, plivo gateway for respective services.
PDF Invoice : Laundry lets you download the invoice/payment details in PDF format.
Fully Responsive : Laundry is fully responsive and is designed in such a way that it looks great with every devices and is accessible on all devices.
Export CSV Reports : You can get download various types of reports in CSV format easily from your dashboard.
Single-Page Checkout : Single-Page Checkout is the way you fall in love with it, users can put all the required details on same page till the booking computer.
Easy to Schedule : Appointment booking is super easy and quick. Just few clicks and your work will be done.
15. How to use Stripe Payment Gateway in Laundry?
Getting Publishable Key and Secret Key
Login your stripe account .
Select Developers > API keys on the sidebar of the Stripe Dashboard.
On the API tab find the Publishable key and Secret key fields and copy their values.
Paste both keys in your Laundry admin area Stripe settings.
You can schedule your time slots for service easily form this panel. Your can manage your availability , breaks , off times and off days.
Latest version 1.1.
Change Log 1.1
Individual pricing for each service.
Change Log
Version 1.0 released
Technology
PHP
Mysql
HTML
jQuery
JSON
Bootstrap
17. Update with New Version
Laundry provide number of features in current version . One of the main feature is Auto Update provided by the Laundry. First of all just take backup of old Laundry files which is on your root path (http://yourwebsite/laundry/). Just follow the steps to update Laundry into latest version:
Step 1: Please take backup of your whole Laundry files and also with database.
Step 2 : If you are using old version then you will see this icon for update version on your admin area header section.
If you are using update version then it will not showing on the top of header.
Step 3: Click on icon for update your version. You will see one popup for latest version with update feature details. Click on Update button and update your version.
Step 4 : It will automatically update your version of Laundry. But it need to reinstall your Laundry. Don't worry your previous configuration is save. You no need to update once again your configuration.
Step 5: Choose Update radio button for update your version and then proceed same as like your previous installation process.
Let us know if you facing any issue. Our support team is available for your help.
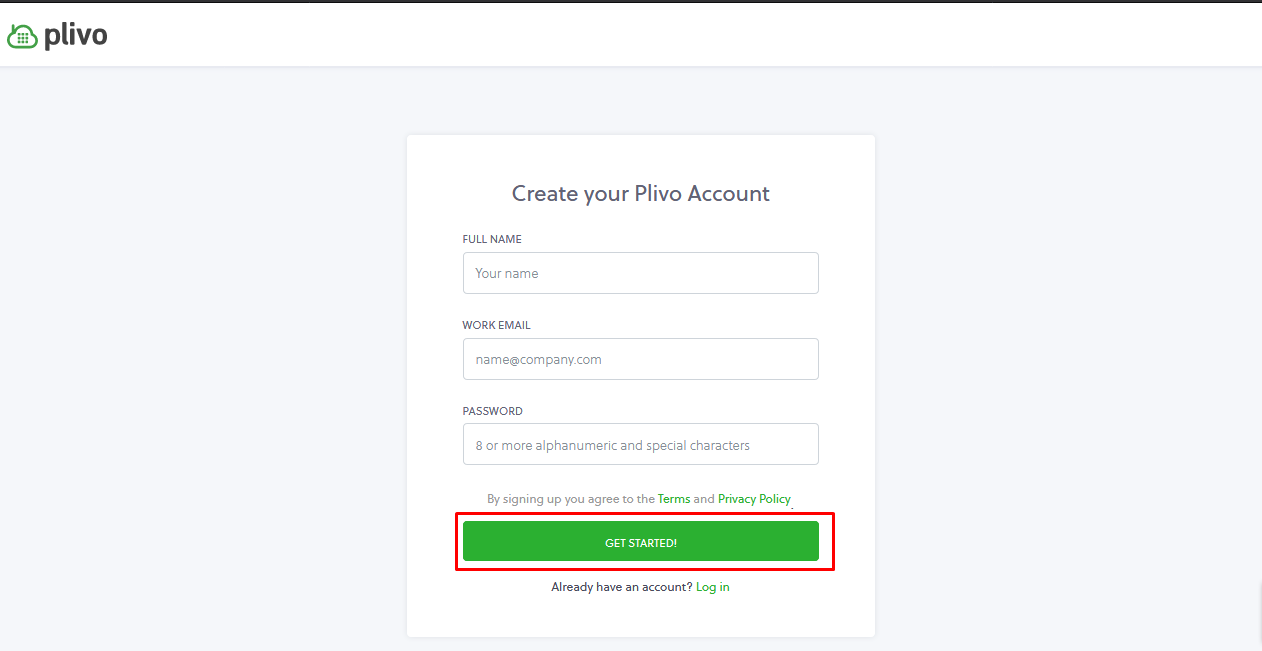
18. How to use Plivo SMS Gateway in Laundry?
Plivo's SMS API Platform and Voice API Platform enables businesses to communicate with their customers at global scale. Sign up for free now.
laundry provide Plivo SMS gateway service free of cost. We have integrate Plivo in default in our product. Please Proceed the steps and Use Plivo On your instance.
Step 1 : Create your account on Plivo with using this link. If you have already register on Plivo then go to login and access the credentials.
Step 2 : If you are not register then Create your account here.
Step 3 : if you already register then login your account here.
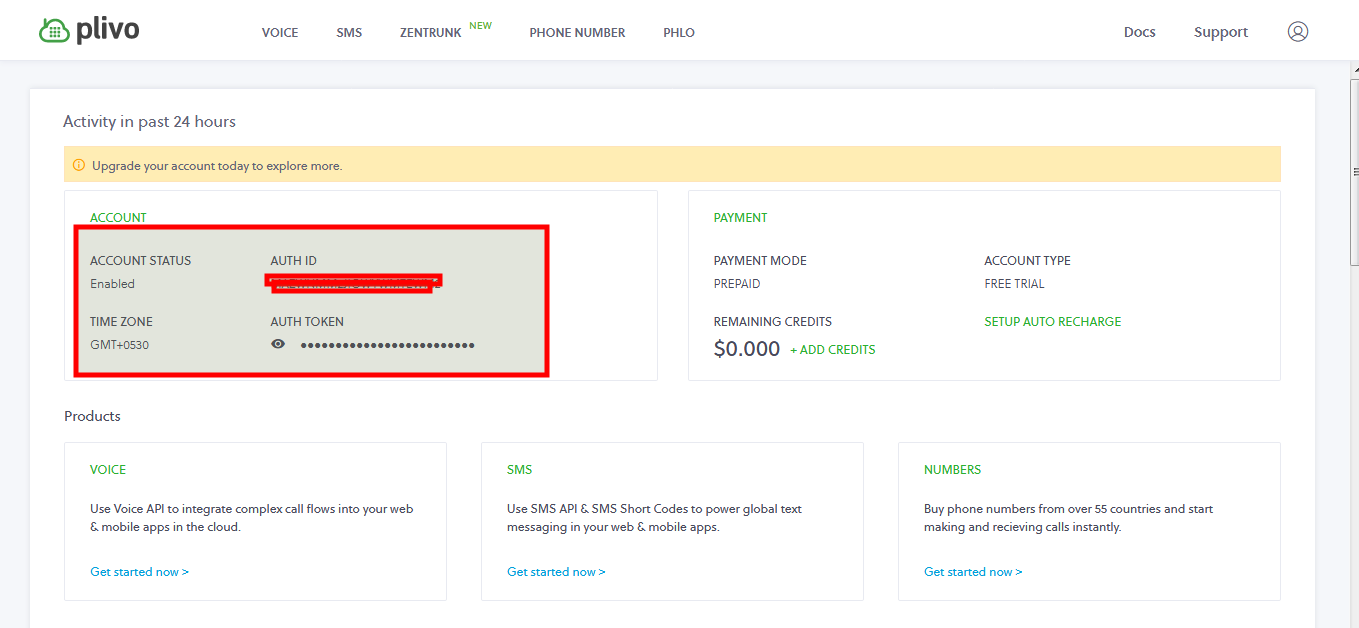
Step 4 : After login you will see your Account SID and Auth Token On your dashboard.
Step 5 : Copy SID and Token and paste in admin area Plivo settings fields. Save and proceed next.
Laundry is fully translatable. For make Laundry translatable follow these steps:
Step 1 - At first, You will select required language to display from Settings-> Company.
Step 2 - After choosing preferred language you just need to set Labels (Settings-> Labels), to write your translations.
Step 3 - Select your language to translate the labels.
Step 4 - Now you can change you language labels in right side. Here we show English as default Label. As you change the labels and update, it will show on front, default or unchanged labels will show in English only.
20. Shortcode or embed code in website
Is this product having any easy way to integrate this booking system with my current website?
You don't have to worry about maintain your site and products differently. This embed code section allow you to generate the global button for your booking page. You can easily merge the booking button any where in your site make working the booking. You can make shodecode or embed code with two ways:
1. Show on page load (Open iframe of front page).
2. Show on a button click (Make button and on click button the booking page open in new window).


 Step 3 :- Please login into your Laundry admin panel and go to "Embed Code" menu . Choose embed code style which you want to show on your WordPress website. Laundry have two style of embed code.
First Method - Show on page load (show Laundry booking form on page load)
Step 3 :- Please login into your Laundry admin panel and go to "Embed Code" menu . Choose embed code style which you want to show on your WordPress website. Laundry have two style of embed code.
First Method - Show on page load (show Laundry booking form on page load)


 Also user have a option for cancel and reschedule appointment. ( its depend upon admin settings for cancellation policy )